采用OpenCore构建Hackintosh黑苹果
-
采用OpenCore构建Hackintosh黑苹果
- 基本流程
- 硬件配置限制核查
- 环境准备
- 安装U盘
- EFI文件夹的配置
- 安装以及后处理
- 专项问题处理
- 其他问题
- 实例
基本流程
- 检查硬件设施的兼容性,确定需要仿冒的机型SMBIOS以及OS版本
- 制作安装U盘,准备EFI文件
- 调整EFI的文件尤其是config.plist和KEXTS
- 安装
- 后处理
硬件配置限制核查
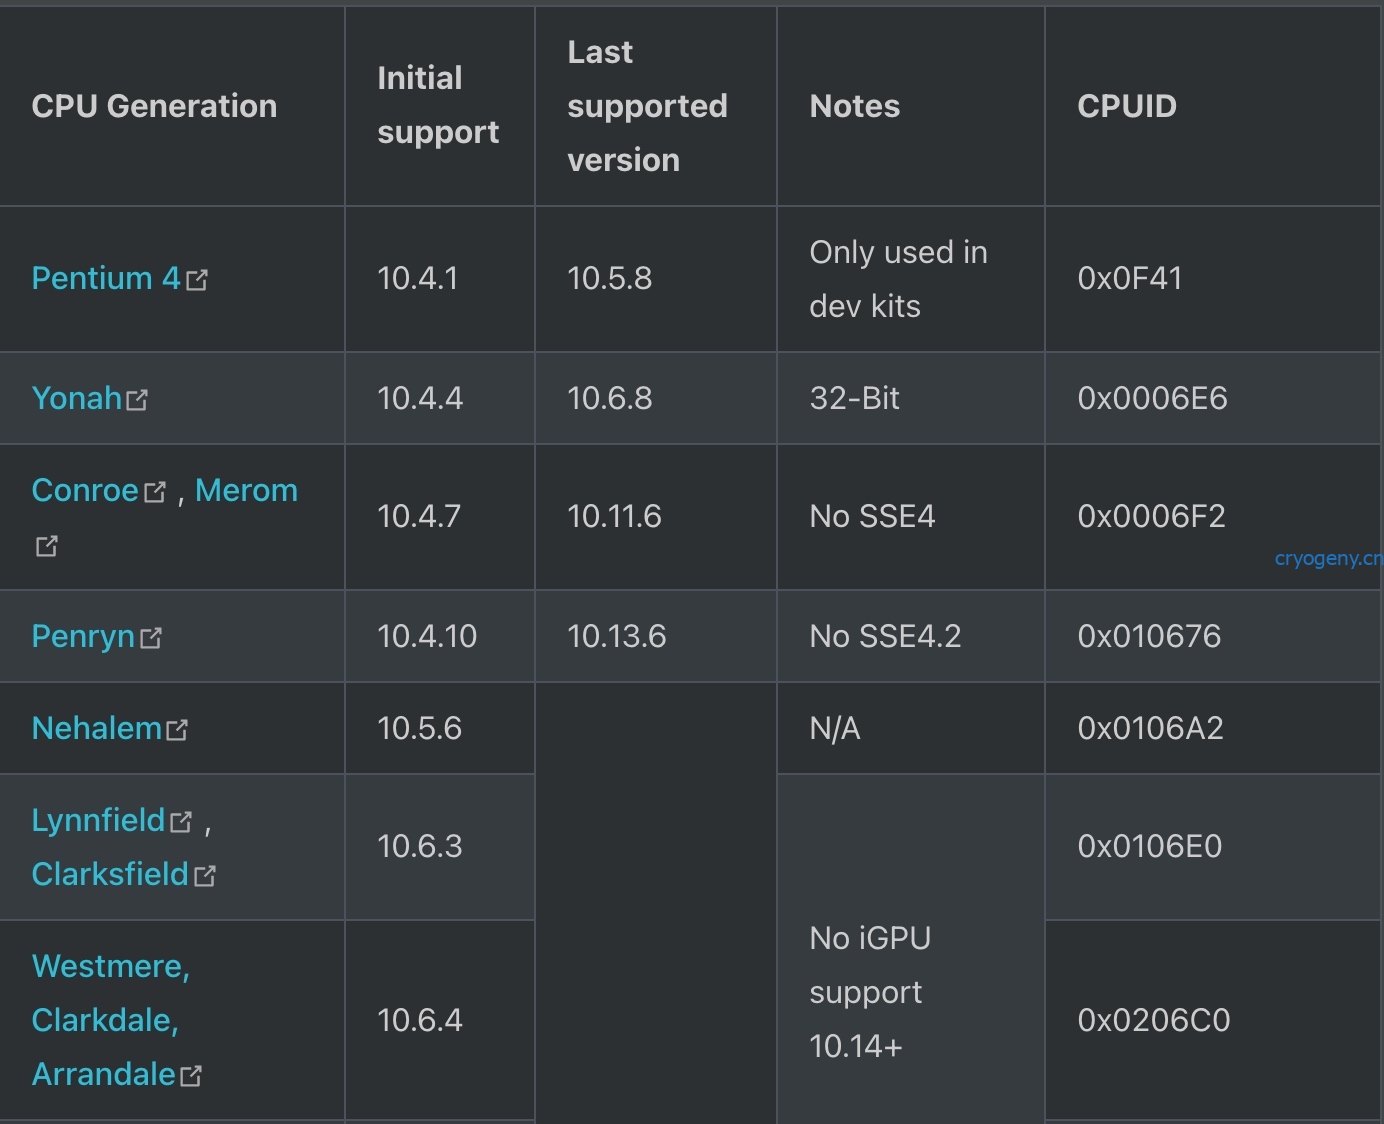
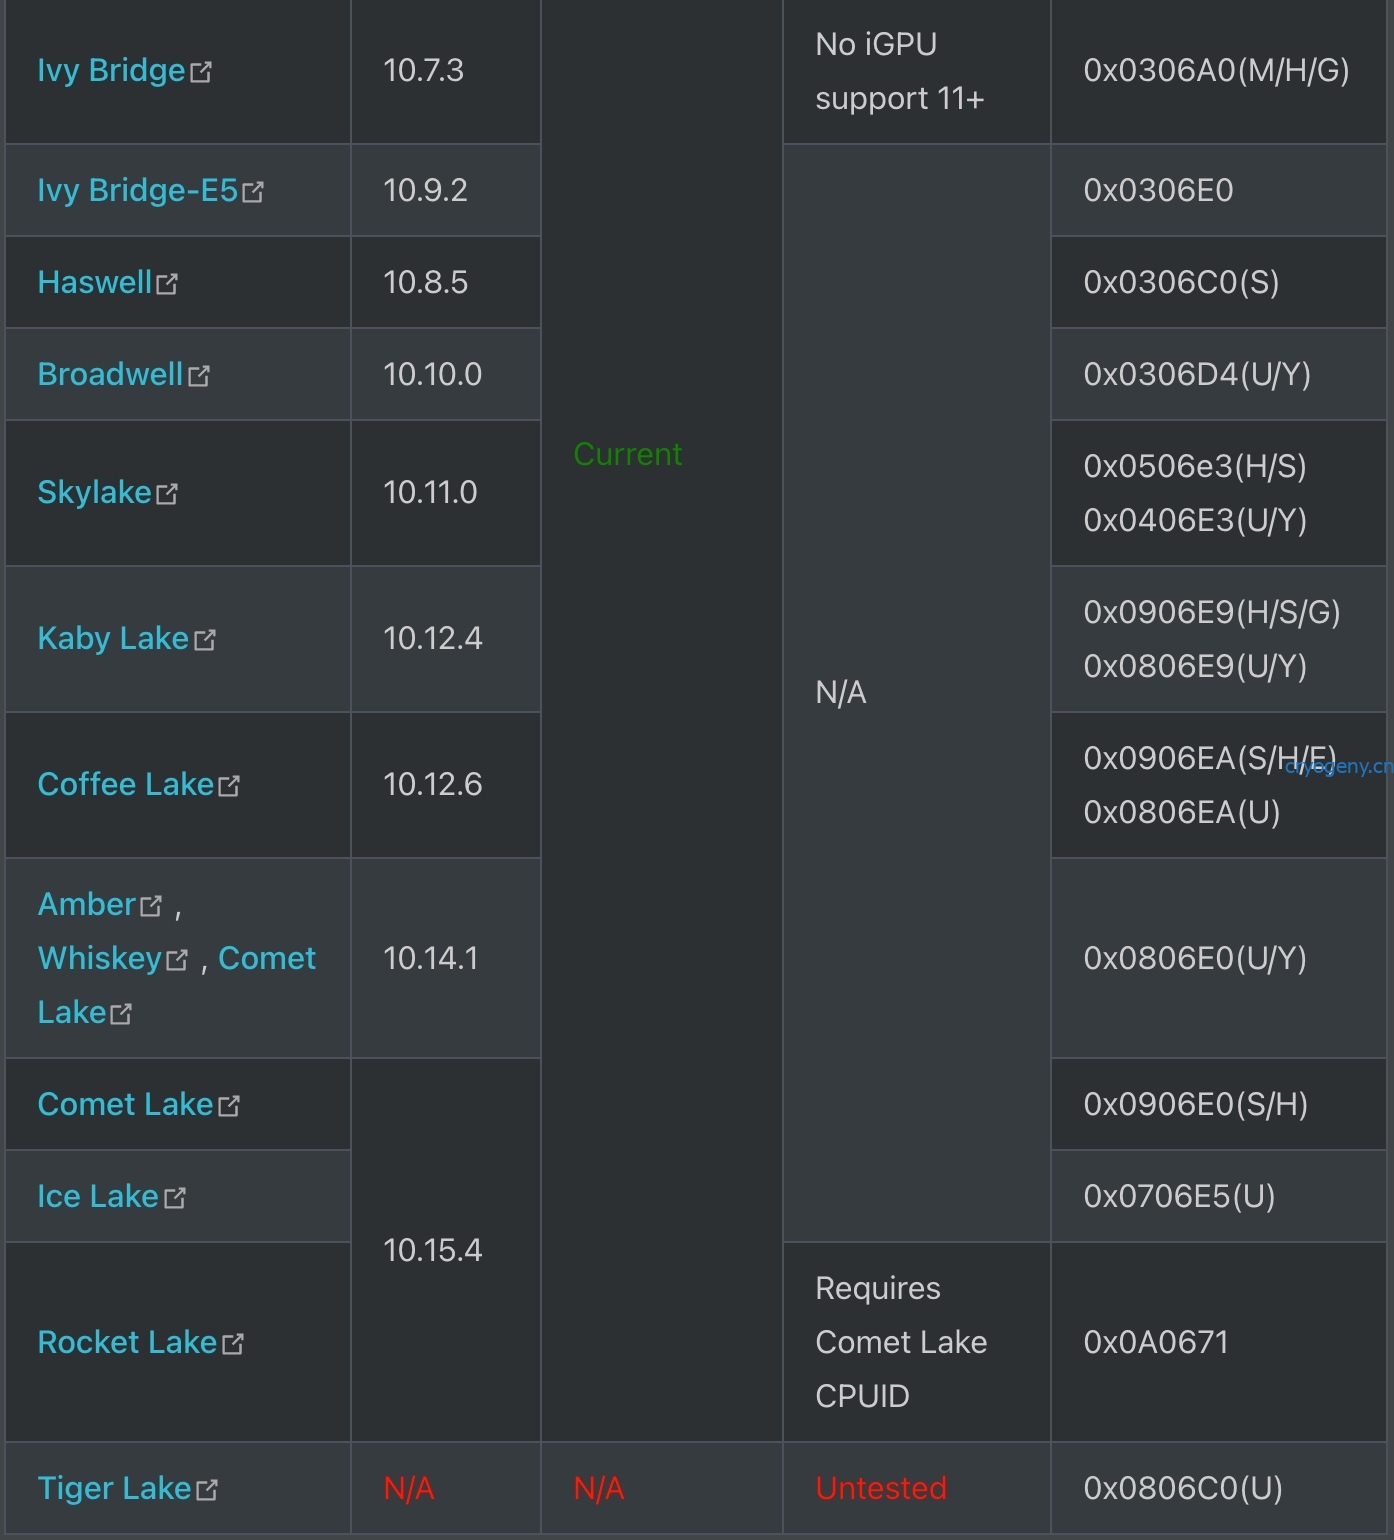
CPU
英特尔处理器
AMD处理器
AMD的处理器有部分功能不支持,主要表现在
- 基于AppleHV的虚拟机等应用
- This includes **VMWare, Parallels, Docker, Android Studios, etc
** 仅仅 VirtualBox可以用,
VMware 10 and Parallels 13.1.0 也可以用,但版本太低有安全风险
- This includes **VMWare, Parallels, Docker, Android Studios, etc
- Adobe 的支持 [已经可以解决]
- Most of Adobe's suite relies on Intel's Memfast instruction set, resulting in crashes with AMD CPUs
- You can disable functionality like RAW support to avoid the crashing: Adobe Fixes(opens new window)
- 32-Bit 支持
- Mojave及以下仍然有部分软件是32位的,而AMD Vanilla补丁是不支持32位的。
- 也有定制的内核系统,但没法使用imessage等 A work-around is to install a custom kernel (opens new window), however you lose iMessage support
- Stability issues on many apps 稳定性问题
- 音频 Audio-based apps are the most prone to issues, ie. Logic Pro
- 达芬奇软件等 DaVinci Resolve has been known to have sporadic issues as well
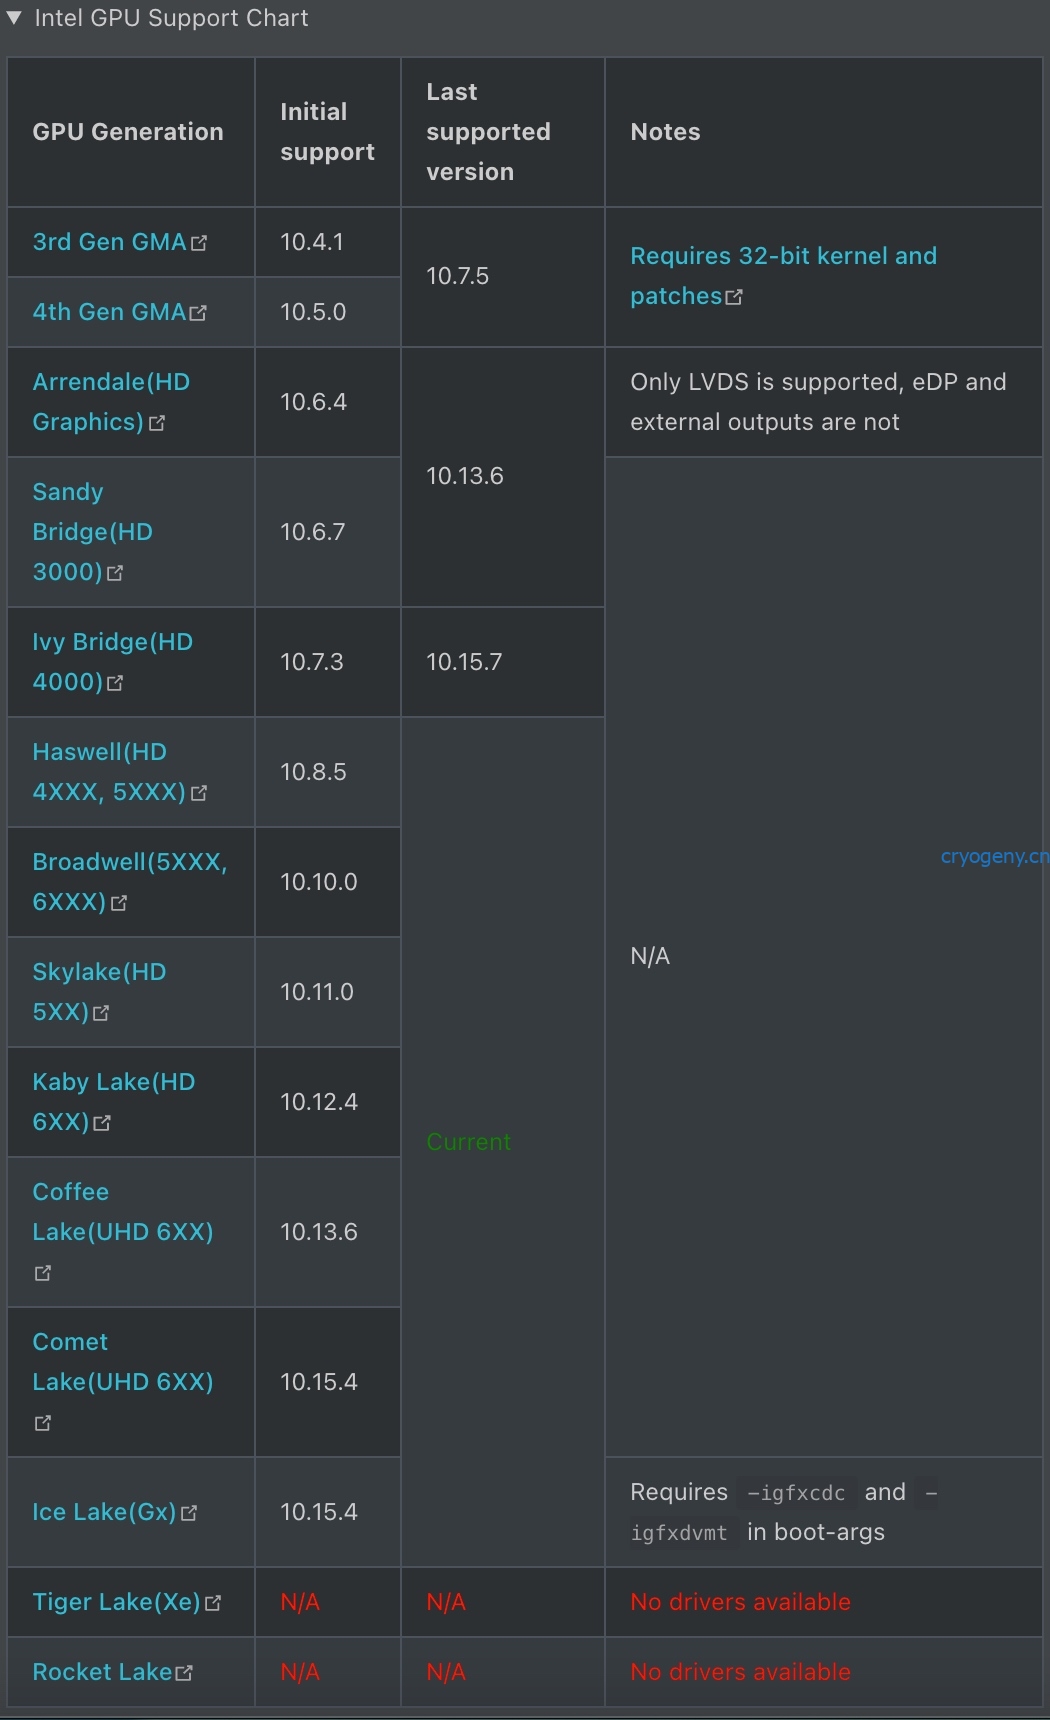
GPU
笔记本的独立显卡直接禁用即可,绝大部分都不能驱动;当独显通过HDMI miniDP输出时,也许有一定可能性。
英特尔核显
A卡

AMD 的APU是不支持的
GCN的显卡从6xxx系列开始,更早的显卡已经不支持了
N卡
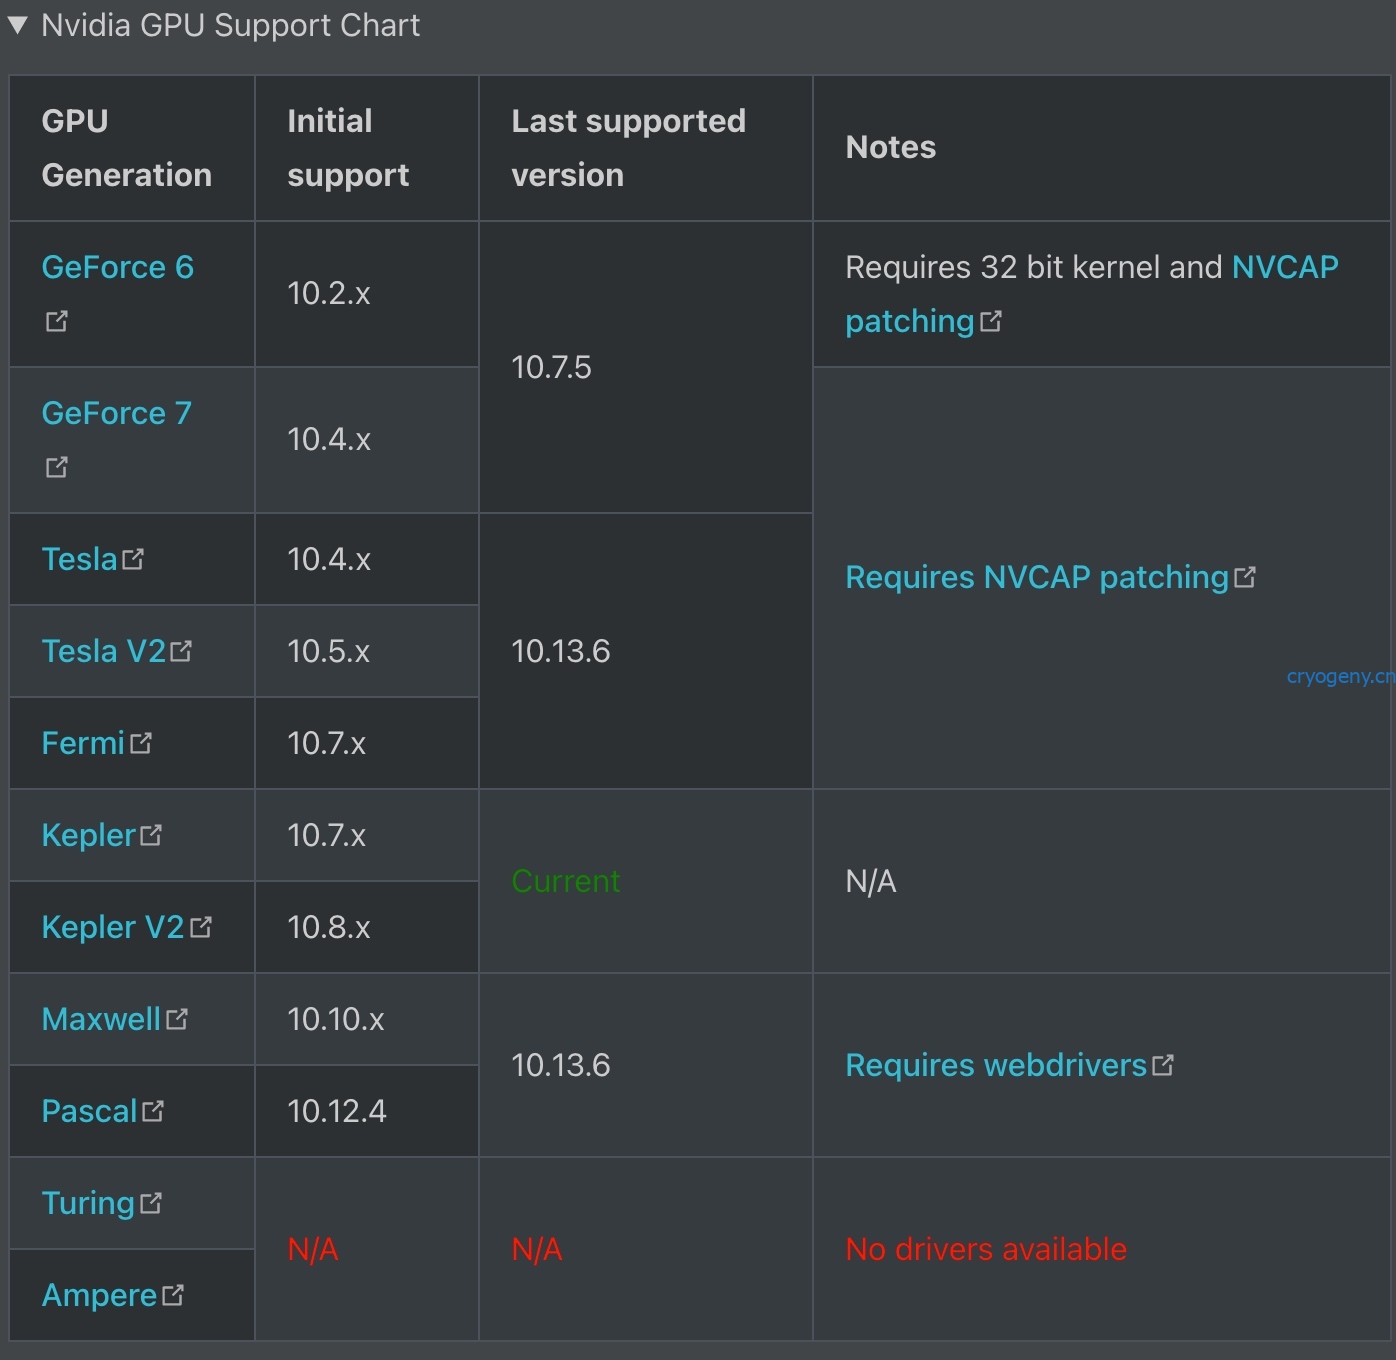
Maxwell 9xx 和Pascal 10xx GPU最高支持10.13 High Sierra
Turing 架构下的20xx 16xx 完全不支持
Ampere 架构下的30xx 完全不支持
Kepler 架构是最为推荐的,可以支持MacOS Bigsur
主板
AMD B550主板需要SSDT-CPUR.aml补丁
硬盘
- Samsung PM981, PM991 and Micron 2200S NVMe SSDs 这些可以采用NVMEfix.kext来修复,但仍有一定可能出现引导问题。
- 三星970 Evo plus 有同样的问题,但可以通过固件升级解决 here
- Intel 傲腾内存以及 美光3D Xpoint对HDD加速的情况,MacOS不支持
- Intel600p 不支持
网卡
- Intel I225 2.5Gb NIC
- Intel I350 1Gb server NIC
- Normally found on Intel and Supermicro server boards of various generations
- Workaround
- Intel 10Gb server NICs
- Workarounds are possible for X520 and X540 chipsets
- Mellanox and Qlogic server NICs
无线网卡
| Wifi Card | 11 | 10.15 | 10.14 | 10.13 | 10.11 | 不支持 | |
|---|---|---|---|---|---|---|---|
| BCM943602 | ✔ | ✔ | ✔ | ✔ | ✔ | ||
| BCM94360 | ✔ | ✔ | ✔ | ✔ | ✔ | ||
| BCM94352 | ✔ | ✔ | ✔ | ✔ | ✔ | ||
| BCM94350 | ✔ | ✔ | ✔ | ✔ | ✔ | ||
| BCM943224 | ✔ | ✔ | ✔ | ✔ | |||
| BCM94331 | ✔ | ✔ | ✔ | ✔ | IO80211Family.kext | ||
| BCM94322 | ✔ | ✔ | ✔ | ||||
| AR242x | ✔ | ✔ | |||||
| AR542x | ✔ | ✔ | |||||
| AR5416 | ✔ | ✔ | |||||
| AR5418 | ✔ | ✔ | |||||
| AR9280 – AR5BHB92 | ✔ | ✔ | |||||
| AR9285 – AR5B95 | ✔ | ✔ | |||||
| AR9287 – AR5B97 | ✔ | ✔ | |||||
| AR9380 – AR5BXB112 | ✔ | ✔ | |||||
| BCM4311 | ✔ | ||||||
| BCM4318 | ✔ | ||||||
| BCM4306 | ✔ | ||||||
| BCM4309 | ✔ | ||||||
| BCM4321 | ✔ | ||||||
| BCM4322 | ✔ | ||||||
| BCM4312 | 🚫 | ||||||
| BCM4313 | 🚫 | ||||||
| BCM4356 | 🚫 | ||||||
| BCM43142 | 🚫 | ||||||
| BCM43228 | 🚫 | ||||||
| AR5424 | 🚫 |
推荐网卡及其支持功能和机型
BCM943602CDP(Wifi) + 20703A1(Bluetooth 4.0) + U.FL Connector
iMac16,x
iMac17,1
iMac18,x(Different Bluetooth module, 20703A2, Bluetooth 4.2)
BCM94360CD(Wifi) + 20702B0(Bluetooth 4.0) + U.FL Connector
iMac14,x
iMac15,x
MacPro6,1
BCM94331CD(Wifi) + BRCM20702(05AC:828b, Bluetooth 4.0) + U.FL Connector
iMac13,x
BCM94360CS2(Wifi) + BRCM20702(05AC:821f, Bluetooth 4.0) + MHF4 Connector
MacBookAir5,x
MacBookAir6,x
MacBookAir7,x
BCM943602CS(Wifi) + 20703A1(Bluetooth 4.0) + MHF4 Connector
MacBookPro12,x
BCM94360CS(Wifi) + 20702B0(Bluetooth 4.0) + MHF4 Connector
Macmini7,x
MacBookPro11,x
BCM94360CSAX + BRCM20702(05AC:828c, Bluetooth 4.0) + MHF4 Connector
MacBookPro10,x
BCM94350 + MHF4 Connector
MacBook8,1 – 4350C1, Bluetooth 4.0
MacBookPro13,x – 20703A2, Bluetooth 4.2
MacBookPro14,x – 4350, Bluetooth 4.2
Apple 原生网卡
BCM4364(Wifi) + 4364B0(Bluetooth 5.0)
iMac19,x
Macmini8,1
MacBookPro15,x
iMacPro1,1 – 4364(Bluetooth 4.2)
MacPro7,1- 4364B3(Bluetooth 5.0)
其他项目
指纹
不可用
人脸识别
I2C连接不可用,USB连接可能可以驱动摄像头,但识别是不可能的
headphone Jack combo 🎧
Laptops with Intel SST will not have anything connected through them (usually internal mic) work, as it is not supported. You can check with Device Manager on Windows.
采用ALCplugFix模块可以解决部分
雷电 USB-C接口
BIOS中禁用thunderbolt,一了百了
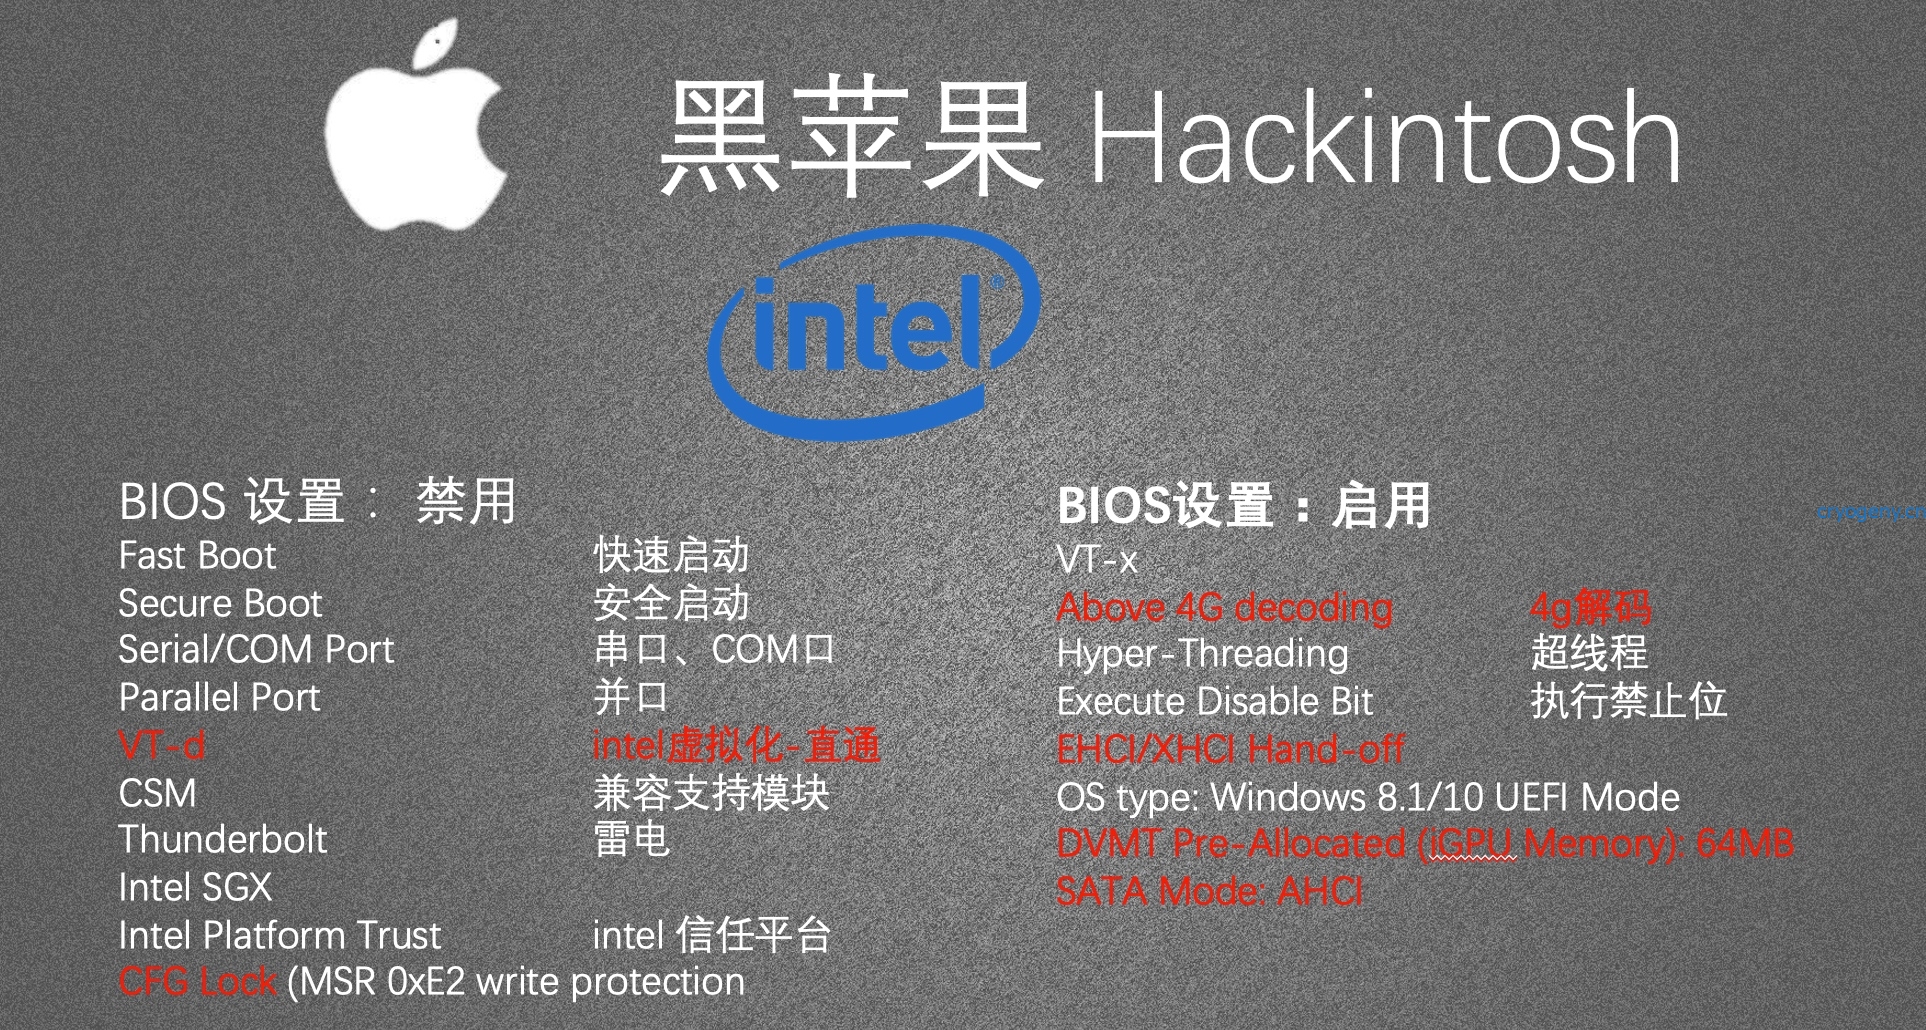
BIOS设置
设置项目内容
环境准备
安装U盘
EFI文件夹的配置
ACPI文件夹
方案一,采用预编译aml文件
dortania 预编译asm文件以及需要修改再编译的dsl文件地址如下
桌面

高端桌面

笔记本
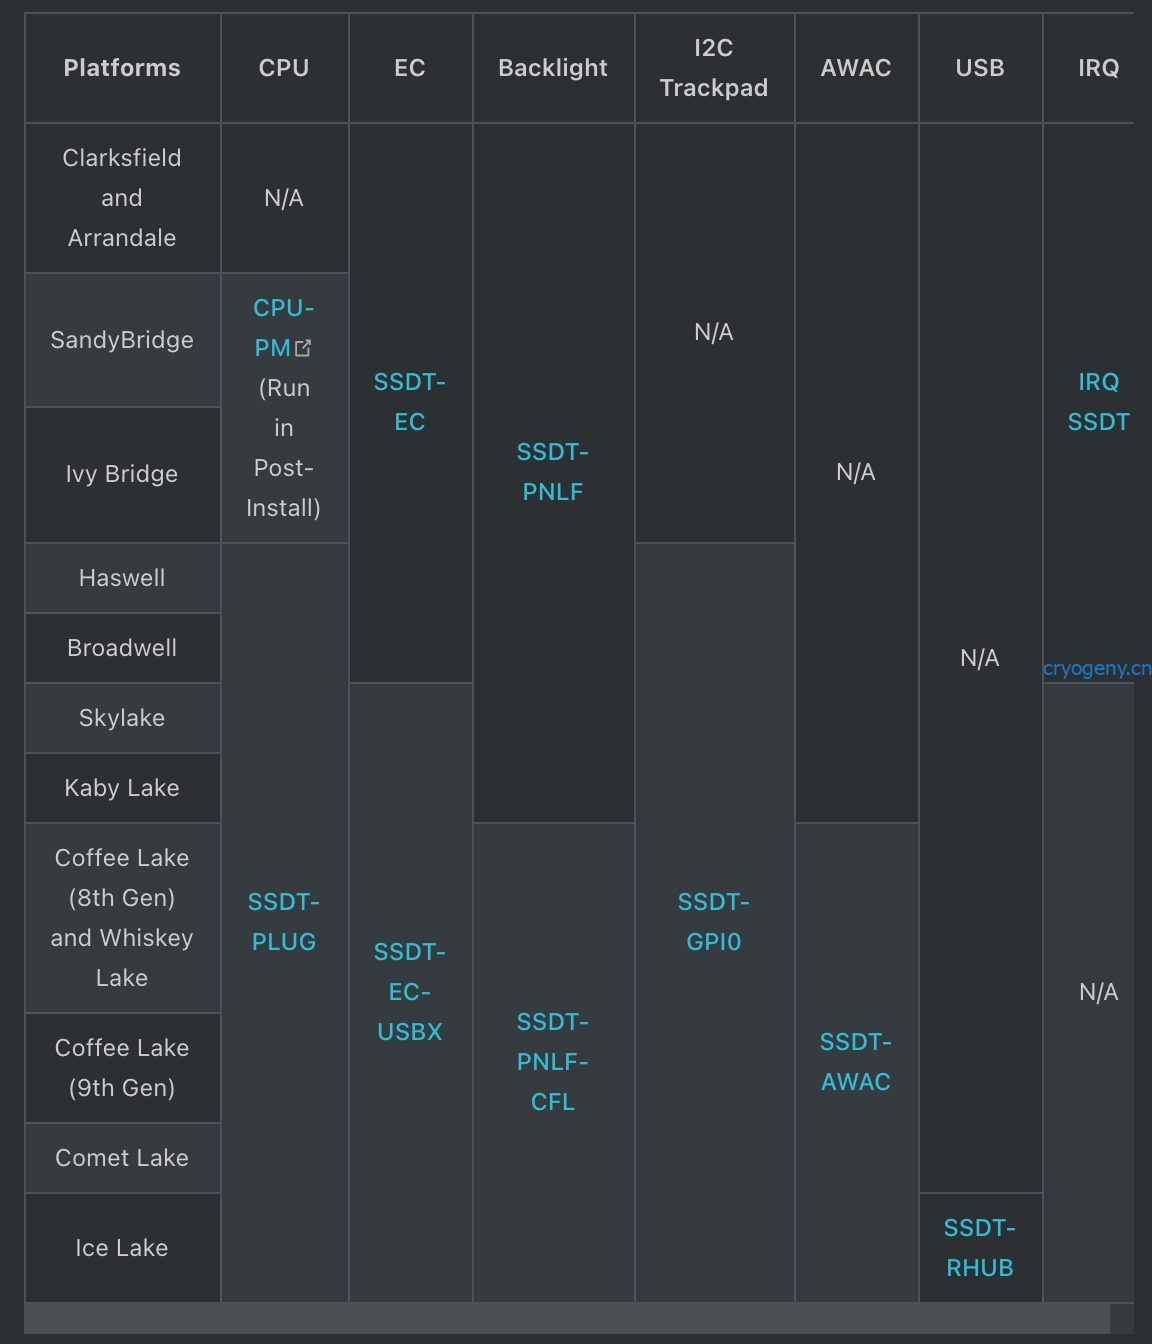

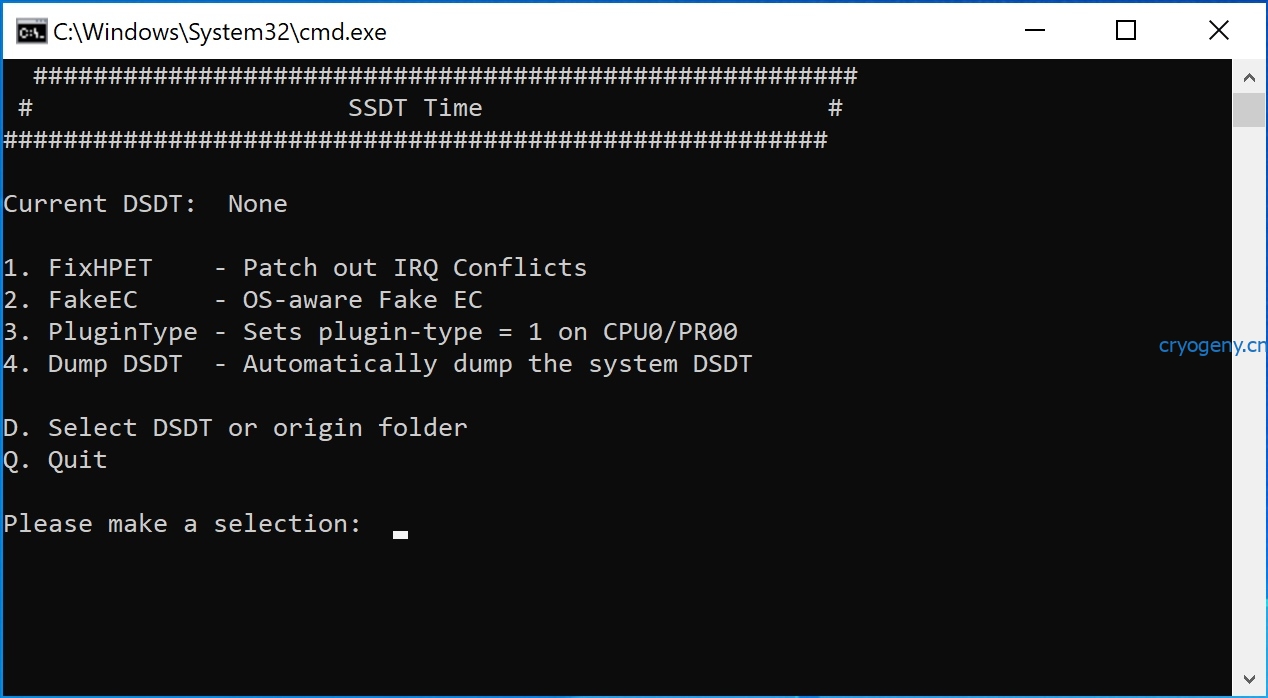
方案二 采用SSDTTime工具自动生成
下载SSDTTime
在目标机器下,windows/linux下运行SSDTTime脚本
可以获得以下脚本
- SSDT-PNLF
- SSDT-GPI0
- USBX SSDT
- IMEI SSDT
- RTC0 RANGE SSDT
运行界面,应该有8个选项,下图示例显示4个选项
打开以后,首先选择 dump DSDT选项,然后选择其他的补丁选项
- FixHPET – Patch out IRQ Conflicts
IRQ patching, mainly needed for X79, X99 and laptop users (use option C to omit conflicting legacy IRQs)
此部分被使用时,应同时将oc_patches.plist合并到config.plist的ACPI/patch下 - FakeEC – OS-aware Fake EC
This is the SSDT-EC, required for Catalina users - FakeEC Laptop – OS-aware Fake EC
This is the SSDT-EC, but the laptop version only Builds Fake EC and leaves the existing EC devices untouched, again required for Catalina users - PluginType – Sets plugin-type = 1 on First ProcessorObj
This is the SSDT-PLUG, for Intel only - PMC – Sets Power Management controller status
This is the SSDT-PMC, for Intel true 300+ series only, this device is missing from ACPI in recent boards and helps to bring back NVRAM support. - AWAC – Context-Aware AWAC Disable and RTC Fake
This is the SSDT-AWAC/RTC0, its purpose is to fix the system clocks found on newer hardware - USB Reset – Reset USB controllers to allow hardware mapping
This is SSDT-RHUB, used for resetting USB ports in macOS for Asus's Z490 motherboards - Dump DSDT – Automatically dump the system DSDT
Dumps your DSDT from your firmware
config文件调整
安装以及后处理
专项问题处理
broadcom蓝牙设备
broadcom项目地址
BrcmPatchRAM.kext: 适用于 10.10 或更早版本.
BrcmPatchRAM2.kext: 适用于 10.11-10.14.
BrcmPatchRAM3.kext: 适用于 10.15 或更高版本
同时,在同一位置安装 BrcmFirmwareData.kext 引导加载方式或BrcmFirmwareRepo.kext 系统/L/E注入方式,但两者不能同时进行
对于10.10及更老的系统,还需要使用 BrcmBluetoothInjectorLetacy.kext
对于10.11及更新的系统,如果是使用 BrcmPatchRAM3.kext,则还应该加载 BrcmBluetoothInjector.kext ,这个injector仅能配合BrcmPatchRAM3.kext进行使用
-
BrcmBluetoothInjector支持设备一览表
- [0489:e032] 20702 E032 Combo
- [0489:e042] 20702A1 Lenovo China standalone
- [0489:e046] 20702A1 Acer 43228+20702 combo card
- [0489:e04f] 20702A1 Lenovo China 43227 WLAN + 20702A1 Combo card
- [0489:e052] 20702 non-UHE Generic
- [0489:e055] 43142A0 Acer combo
- [0489:e059] Acer 43228 + 20702A1 combo
- [0489:e079] Lenovo China 43162 NGFF
- [0489:e07a] Lenovo China 4352+20702 NGFF
- [0489:e087] Acer 43228 NGFF combo module
- [0489:e096] BCM43142A0
- [0489:e097] Acer Foxconn BCM4356A2 NGFF
- [0489:e0a1] 20703A1 Lenovo 43602 NGFF combo
- [04ca:2003] 20702A1 Lenovo China standalone
- [04ca:2004] LiteOn 43228+20702 combo
- [04ca:2005] LiteOn 43228+20702 combo
- [04ca:2006] LiteOn 43142 combo
- [04ca:2009] LiteOn 43142 combo
- [04ca:200a] LiteOn 4352 combo
- [04ca:200b] LiteOn 4352 combo
- [04ca:200c] LiteOn 4352 combo
- [04ca:200e] Liteon 43228 NGFF combo
- [04ca:200f] Acer_LiteOn BCM20702A1_4352
- [04ca:2012] Acer BCM943142Y NGFF
- [04ca:2013] Acer LiteOn BCM4356A2 NGFF
- [04ca:2014] Asus LiteOn BCM4356A2 NGFF
- [04ca:2016] Lenovo 43162 NGFF combo module
- [04f2:b4a1] ASUS Chicony BCM43142A0 NGFF
- [04f2:b4a2] BCM4356A2
- [050d:065a] 20702 standalone
- [0930:021e] 20702A1 Toshiba standalone
- [0930:021f] Toshiba 43142
- [0930:0221] 20702A1 Toshiba 4352
- [0930:0223] 20702A1 Toshiba 4352
- [0930:0225] Toshiba 43142 combo NGFF
- [0930:0226] Toshiba 43142 combo NGFF
- [0930:0229] 43162 combo NGFF
- [0a5c:2168] BRCM Generic 43162Z
- [0a5c:2169] BRCM Generic 43228z
- [0a5c:216a] Dell DW1708 43142Y combo
- [0a5c:216b] HP Rapture 4352z ngff combo
- [0a5c:216c] HP Harrier 43142
- [0a5c:216d] HP Hornet 43142Y ngff combo
- [0a5c:216e] HP Blackbird 43162 NGFF
- [0a5c:216f] Dell DW1560 4352+20702 M.2
- [0a5c:217d] BCM2070 – BCM943224HMB, BCM943225HMB Combo
- [0a5c:21d7] BRCM Generic 43142A0 RAMUSB
- [0a5c:21de] 4352+20702A1 combo
- [0a5c:21e1] 20702A1 non-UHE HP SoftSailing
- [0a5c:21e3] 20702A1 non-UHE 4313 combo HP Valentine
- [0a5c:21e6] 20702 non-UHE Lenovo Japan
- [0a5c:21e8] 20702A1 dongles
- [0a5c:21ec] 20702A1 REF6 OTP module standalone
- [0a5c:21f1] 43228 combo
- [0a5c:21f3] Lenovo Edge 43228 + 20702A1 combo
- [0a5c:21f4] Lenovo Edge 4313 + 20702A1 combo
- [0a5c:21fb] HP Supra 4352 20702A1 combo
- [0a5c:21fd] BRCM Generic 4352z RAMUSB
- [0a5c:640a] BRCM Generic Reference 4356
- [0a5c:640b] HP Luffy 43228 + 20702 M.2
- [0a5c:640e] Lenovo 4356 NGFF combo
- [0a5c:6410] 20703A1 RAM download – DW1830 43602
- [0a5c:6412] Dell 4350C5
- [0a5c:6413] Broadcom Generic 4350C5
- [0a5c:6414] Lenovo 4350C5
- [0a5c:6417] Zebra 4352
- [0a5c:6418] HP Brook 2x2ac
- [0a5c:7460] 20703A1 RAM download
- [0b05:17b5] Asus 43228+20702A1 combo
- [0b05:17cb] 20702 standalone
- [0b05:17cf] Asus 4352_20702A1 combo
- [0b05:180a] Azurewave 4360+20702 combo
- [0b05:181d] Asus AZUREWAVE MB BCM4356A2
- [0bb4:0306] 20703A1 HTC runtime RAM dongle
- [105b:e065] LenovoChina 43142A0 combo
- [105b:e066] LenovoChina 43228+20702 combo
- [13d3:3384] 20702A1 Azurewave standalone
- [13d3:3388] BRCM Generic 43142A0 RAMUSB
- [13d3:3389] BRCM Generic 43142A0 RAMUSB
- [13d3:3392] Azurewave 43228+20702
- [13d3:3404] 4352HMB Azurewave Module
- [13d3:3411] Dell Alienware 4352 20702A1 combo
- [13d3:3413] Azurewave 4360+20702 combo
- [13d3:3418] Azurewave 4352+20702 combo module
- [13d3:3427] Toshiba 43142 combo NGFF
- [13d3:3435] AZUREWAVE BCM20702A1_4352
- [13d3:3456] AZUREWAVE BCM20702A1_4352
- [13d3:3473] Asus AZUREWAVE BCM4356A2 NGFF
- [13d3:3482] AZUREWAVE BCM43142A0 NGFF
- [13d3:3484] Acer AZUREWAVE BCM43142A0 NGFF
- [13d3:3485] Asus AZUREWAVE BCM4356A2 NB 2217NF
- [13d3:3488] Asus AZUREWAVE BCM4356A2 NB 2210
- [13d3:3492] Asus AZUREWAVE BCM4356A2 NGFF
- [13d3:3504] AW CM217NF BCM4371C2
- [13d3:3508] AW ASUS CM217NF BCM4371C2
- [13d3:3517] AW CE160H BCM20702
- [145f:01a3] 20702A1 Asus Trust standalone
- [2b54:5600] Emdoor AP6356SD BCM4356A2
- [2b54:5601] Asus AP6356SDP1A BCM4356A2
- [2b54:5602] AMPAK AP6356SDP2A BCM4356A2
- [33ba:03e8] TOULINEUA BCM94360Z4 4360+20702 combo
- [33ba:03e9] TOULINEUA BCM94360Z3 4360+20702 combo
- [413c:8143] DW1550 4352+20702 combo
- [413c:8197] Dell DW380 Nancy Blakes standalone
-
BrcmPatchRAM支持任何基于BCM20702芯片组的Broadcom USB蓝牙设备
-
非PatchRAM设备(BrcmPatchRAM用于加速睡眠后的恢复):
- [03f0:231d] HP 231d (ProBook BT built-in firmware)
- [13d3:3295] Azurewave BCM943225 (20702A bult-in firmware)
-
经过测试的PatchRAM设备:
- [0489:e032] 20702 Combo USB
- [0489:e042] 20702A1 Lenovo China *
- [0489:e079] Lenovo China 43162 NGFF
- [0489:e07a] Lenovo NGFF (4352 / 20702)
- [04ca:2003] 20702A1 Lenovo China
- [04ca:200a] LiteOn (4352 Combo)
- [04ca:200b] LiteOn (4352 Combo) *
- [04ca:200c] LiteOn (4352 Combo)
- [04ca:200f] Acer / LiteOn (4352 Combo)
- [050d:065a] Belkin (20702)
- [0930:0221] Toshiba (4352 / 20702)
- [0930:0223] Toshiba NGFF (4352 / 20702) *
- [0a5c:216b] HP Rapture 4352Z NGFF Combo
- [0a5c:216e] HP Blackbird 43162 NGFF
- [0a5c:216f] Dell DW1560 (4352/20702)
- [0a5c:21de] 4352/20702A1 combo
- [0a5c:21e1] HP Softsailing (20702A1)
- [0a5c:21e6] non-UHE Lenovo Bluetooth (20702)
- [0a5c:21e8] Bluetooth USB Dongle (20702A1) *
- [0a5c:21ec] Inateck Bluetooth (20702A1)
- [0a5c:21fb] HP Supra 4352 (20702A1 Combo)
- [0a5c:21fd] Broadcom 4352Z
- [0a5c:22be] Broadcom BCM20702 Bluetooth 4.0 USB Device
- [0a5c:6410] Dell Wireless 1830 Bluetooth 4.1 LE
- [0a5c:6412] Dell Wireless 1820 Bluetooth 4.1 LE
- [0b05:17cb] Asus BT-400 (20702 stand-alone) *
- [0b05:17cf] Asus (4352/20702A1 combo) *
- [0b05:180a] Azurewave (4360/20702 combo)
- [13d3:3404] Azurewave (4352HMB) *
- [13d3:3411] Dell Alienware (4352/20702A1 combo) *
- [13d3:3413] Azurewave (4360/20702 combo)
- [13d3:3418] Azurewave (4352/20702 combo)
- [13d3:3435] Azurewave (4352/20702 combo)
- [13d3:3456] Azurewave (4352/20702 combo)
- [413c:8143] Dell DW1550 (4352/20702 combo)
Intel 无线网卡驱动
参考项目
http://bbs.pcbeta.com/viewthread-1829402-1-1.html
安装
下载对应的版本,放到驱动文件夹中,编辑config.plist加载,禁用SIP即可
不要同时使用itlwm.kext 和 AirportInlwm.kext (后者稳定性不及前者,但方便,如果遇到问题时,换成 前者+ heliport )
不要将驱动安装到/L/E 或 /S/L/E 中,这样可能会有系统风险
对于AirportInlwm还要注意以下工作
- Opencore 启用 secure boot
- 在Opencore config.plist /Kernel/Force 下强制 IO80211Familly加载,
- 从命令行中来加载AirportItlwm
- 从系统中分析 IO80211Family,插入AirportItlwm作为插件,并在config中设置加载
- 禁用SIP并将AirpotItlwm安装到 /L/E下,但这个有风险,不建议做。
适用的无线网卡一览表
- DVM(IWN)
- 1000 Series
- Intel(R) Centrino(R) Wireless-N 1000 BGN
- Intel(R) Centrino(R) Wireless-N 1000 BG
- Intel(R) Centrino(R) Wireless-N 100 BGN
- Intel(R) Centrino(R) Wireless-N 100 BG
- 2000 Series
- Intel(R) Centrino(R) Wireless-N 2200 BGN
- Intel(R) Centrino(R) Wireless-N 2200D BGN
- Intel(R) Centrino(R) Wireless-N 2230 BGN
- Intel(R) Centrino(R) Wireless-N 105 BGN
- Intel(R) Centrino(R) Wireless-N 105D BGN
- Intel(R) Centrino(R) Wireless-N 135 BGN
- 5000 Series
- Intel(R) Ultimate N WiFi Link 5300 AGN
- Intel(R) WiFi Link 5100 BGN
- Intel(R) WiFi Link 5100 ABG
- Intel(R) WiFi Link 5100 AGN
- Intel(R) WiMAX/WiFi Link 5350 AGN
- Intel(R) WiMAX/WiFi Link 5150 AGN
- Intel(R) WiMAX/WiFi Link 5150 ABG
- 6000 Series
- Intel(R) Centrino(R) Advanced-N 6205 AGN
- Intel(R) Centrino(R) Advanced-N 6205 ABG
- Intel(R) Centrino(R) Advanced-N 6205 BG
- Intel(R) Centrino(R) Advanced-N 6205S AGN
- Intel(R) Centrino(R) Advanced-N 6205D AGN
- Intel(R) Centrino(R) Advanced-N 6206 AGN
- Intel(R) Centrino(R) Advanced-N 6207 AGN
- Intel(R) Centrino(R) Advanced-N 6230 AGN
- Intel(R) Centrino(R) Advanced-N 6230 ABG
- Intel(R) Centrino(R) Advanced-N 6230 BGN
- Intel(R) Centrino(R) Advanced-N 6230 BG
- Intel(R) Centrino(R) Advanced-N 6235 AGN
- Intel(R) Centrino(R) Ultimate-N 6235 AGN
- Intel(R) Centrino(R) Wireless-N 1030 BGN
- Intel(R) Centrino(R) Wireless-N 1030 BG
- Intel(R) Centrino(R) Wireless-N 130 BGN
- Intel(R) Centrino(R) Wireless-N 130 BG
- Intel(R) Centrino(R) Advanced-N 6200 AGN
- Intel(R) Centrino(R) Advanced-N 6200 ABG
- Intel(R) Centrino(R) Advanced-N 6200 BG
- Intel(R) Centrino(R) Advanced-N + WiMAX 6250 AGN
- Intel(R) Centrino(R) Advanced-N + WiMAX 6250 ABG
- Intel(R) Centrino(R) Wireless-N + WiMAX 6150 BGN
- Intel(R) Centrino(R) Wireless-N + WiMAX 6150 BG
- Intel(R) Centrino(R) Ultimate-N 6300 AGN
- 1000 Series
- MVM Gen 1 (IWM)
- 7000 Series
- Intel(R) Dual Band Wireless AC 7260
- Intel(R) Dual Band Wireless N 7260
- Intel(R) Wireless N 7260
- Intel(R) Dual Band Wireless AC 3160
- Intel(R) Dual Band Wireless N 3160
- Intel(R) Wireless N 3160
- Intel(R) Dual Band Wireless AC 3165
- Intel(R) Dual Band Wireless AC 3168
- Intel(R) Dual Band Wireless AC 7265
- Intel(R) Dual Band Wireless N 7265
- Intel(R) Wireless N 7265
- Intel(R) Dual Band Wireless AC 7265
- Intel(R) Dual Band Wireless N 7265
- Intel(R) Wireless N 7265
- 8000 Series
- Intel(R) Dual Band Wireless N 8260
- Intel(R) Dual Band Wireless AC 8260
- Intel(R) Dual Band Wireless AC 8265
- Intel(R) Dual Band Wireless AC 8275
- Intel(R) Dual Band Wireless AC 4165
- 9000 Series
- Intel(R) Wireless-AC 9162
- Intel(R) Wireless-AC 9260
- Intel(R) Wireless-AC 9260-1
- Intel(R) Wireless-AC 9270
- Intel(R) Wireless-AC 9461
- Intel(R) Wireless-AC 9462
- Intel(R) Wireless-AC 9560
- 7000 Series
- MVM Gen 2 (IWX)
- 22000 Series
- Intel(R) Wireless-AC 9162 160MHz
- Intel(R) Wireless-AC 9260 160MHz
- Intel(R) Wireless-AC 9270 160MHz
- Intel(R) Wireless-AC 9461 160MHz
- Intel(R) Wireless-AC 9462 160MHz
- Intel(R) Wireless-AC 9560 160MHz
- Killer (R) Wireless-AC 1550 Wireless Network Adapter (9260NGW)
- Killer (R) Wireless-AC 1550i Wireless Network Adapter (9560NGW)
- Killer (R) Wireless-AC 1550s Wireless Network Adapter (9560NGW)
- Intel(R) Wi-Fi 6 AX101
- Intel(R) Wi-Fi 6 AX200 160MHz
- Intel(R) Wi-Fi 6 AX201 160MHz
- Intel(R) Wi-Fi 6 AX211 160MHz
- Intel(R) Wi-Fi 6 AX411 160MHz
- Intel(R) Wi-Fi 6
- Killer(R) Wi-Fi 6 AX1650w 160MHz Wireless Network Adapter (200D2W)
- Killer(R) Wi-Fi 6 AX1650x 160MHz Wireless Network Adapter (200NGW)
- Killer(R) Wi-Fi 6 AX1650s 160MHz Wireless Network Adapter (201D2W)
- Killer(R) Wi-Fi 6 AX1650i 160MHz Wireless Network Adapter (201NGW)
- 22000 Series
- 不支持的
- MVM Gen 3
- 22000 Series
- Intel(R) Wireless-AC 9560 160MHz
- Intel(R) Wi-Fi 6 AX210 160MHz
- 22000 Series
故障处理
先到命令行下用下列命令查看itlwm 是否被加载
kextstat | grep -i itlwm
返回下列代码表明已经被加载
83 0 0 0xd48000 0xd48000 com.zxystd.AirportItlwm
-
重置系统偏好设置-网络
如果曾经采用其他网络驱动,系统的设置可能被破坏,以下操作会完全重置所有网络相关信息,比如DNS,代理等等,务必做好备份设置- 打开系统偏好设置,网络,删除所有连接
- 打开命令行 运行
-
open /Library/Preferences/SystemConfiguration - 删除
- com.apple.airport.preferences.plist
- preferences.plist
- NetworkInterfaces.plist
- com.apple.network.identification.plist
- com.apple.wifi.message-tracer.plist
- And all files containing enX, (X as an integer)
- 重启
-
使用dmesg获取驱动日志
- 在boot-args 中增加 msgbuf=1048576 启动机器
- 运行以下命令
-
sudo dmesg | grep -i "itlwm" > ~/Desktop/Log_"$(date '+%Y-%m-%d_%H-%M-%S')".log - 查看桌面上的日志文件
笔记本触控板的驱动
VoodooI2C介绍
使用VoodooI2C 来驱动
核心为 VoodooI2C.kext,辅助驱动为VoodooI2CHID.kext等
| 驱动名称 | 功能 | 轮询模式 | 中断模式 | 是否需要调整 IONameMatch |
|---|---|---|---|---|
| VoodooI2CELAN | 支持 ELAN 触摸板 | ❌ | ✔️ | ✔️ |
| VoodooI2CHID | 支持大多数 I2C HID 多点触摸设备 | ✔️ | ✔️ | ❌ |
| VoodooI2CUPDDEngine | UPDD 多点触控引擎 | ❌ | ✔️ | ✔️ |
| VoodooI2CFTE | 支持 FTE 触摸板 | ❌ | ✔️ | ✔️ |
支持的CPU系列至少要4代及以上,如果电脑默认安装的是win7之前(不含win7),则大概率是不支持的;MacOS至少要安装10.10 Yosemite 及以上,采用Opencore引导。
支持I2C芯片如下
- INT33C2 and INT33C3 – Haswell era
- INT3432 and INT3433 – Broadwell era
- pci8086,9d60, pci8086,9d61, pci8086,9d62 and pci8086,9d63 – Skylake era
- pci8086,a160, pci8086,a161, pci8086,a162 and pci8086,a163 – Kaby Lake era
- pci8086,9de8, pci8086,9de9, pci8086,9dea and pci8086,9deb – Cannon Lake/Whiskey Lake era
- pci8086,a368, pci8086,a369, pci8086,a36a and pci8086,a36b – Coffee Lake era
- pci8086,2e8, pci8086,2e9, pci8086,2ea, pci8086,2eb, pci8086,6e8, pci8086,6e9, pci8086,6ea and pci8086,6eb- Comet Lake era
- pci8086,34e8, pci8086,34e9, pci8086,34ea and pci8086,34eb – Ice Lake era
以下设备大类均能完全支持 - I2C-HID 设备
- ELAN 设备
- FTE 设备
留意上述设备存在重叠的情况,比如部分ELAN设备也是I2C-HID设备
#### 准备工作 -
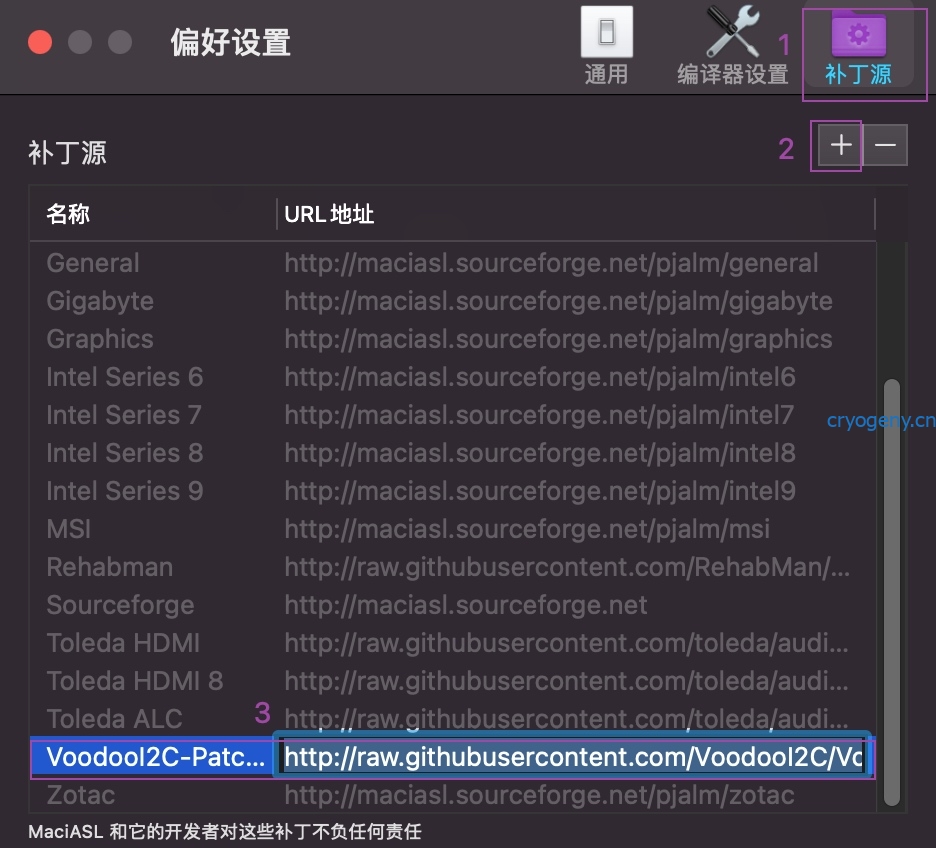
为MaciASL增加voodooI2C patch仓库
- 打开MaciASL,偏好设置,补丁仓库,点击'+'

-
-
输入名称和链接 http://raw.githubusercontent.com/VoodooI2C/VoodooI2C-Patches/master
-
关闭偏好设置窗口
-
由于与苹果的核心驱动的不兼容性,通常需要手动编辑DSDT来启用GPIO中断。这个仅仅适用于skylake以及更高的处理器(haswell-broadwell 可以安全的跳到patch部分,不需要手动编辑)。部分辅助驱动(目前主要是voodooI2CHID.kext)可以运行在两种模式下
- polling mode 轮询:简单视作软件处理,消耗更多资源,但相对方便
- interrupts(APIC 或者GPIO)中断:视作硬件处理,资源消耗比较少,相对负责,需要SSDT处理
-
从2.5.3 版本起,如果APIC中断不可用,voodooI2C驱动会在兼容的设备上尝试分析GPIO pin信息,如果这个不起作用的话,也可以采用强制轮询模式,即在NVRAM boot-arg上增加 -vi2c-no-alt-interrupts 并在deviceProperties中识别触摸板路径,相应增加force-polling
-
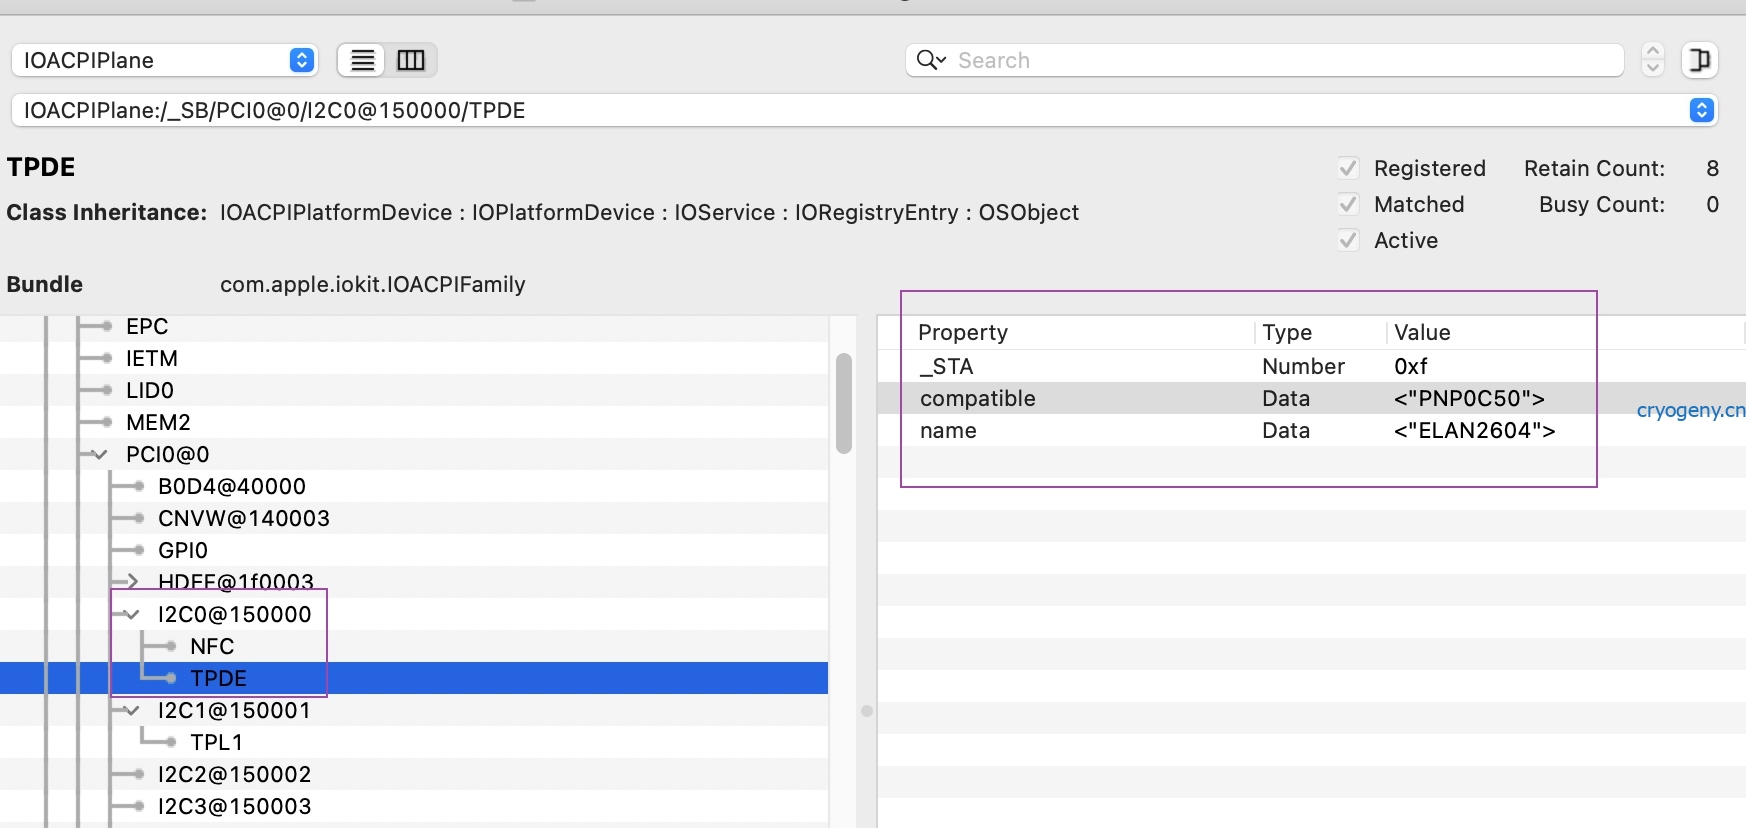
windows下查看I2C HID 设备信息
-
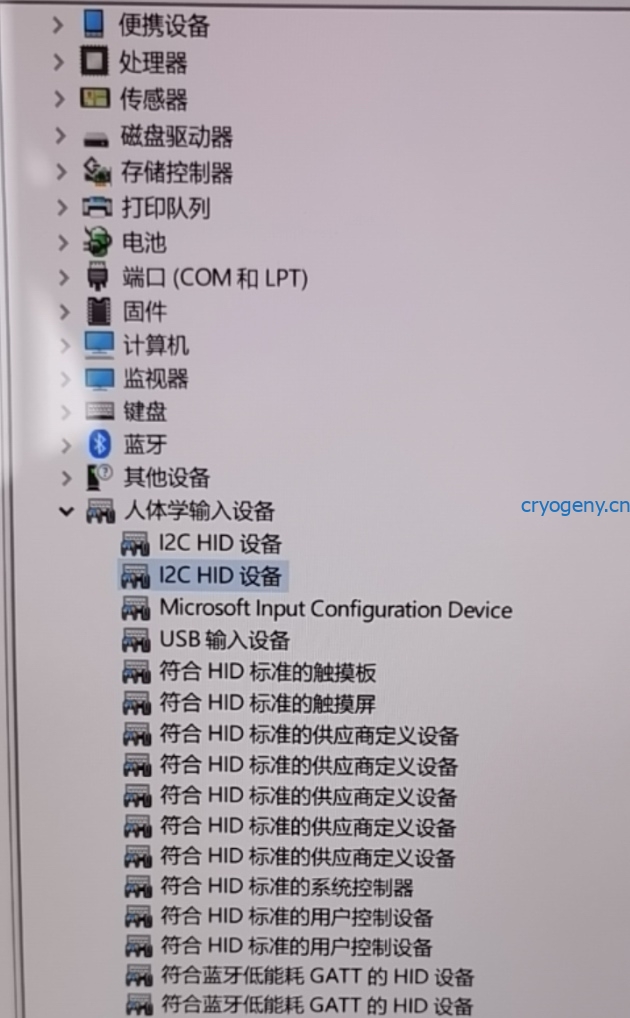 此电脑中有两个触摸设备,可以看到是符合HID标准的触摸板和触摸屏,并且是I2C HID设备,因此应当用本驱动,否则应该要使用voodooPS2Controller或者ApplesmartTouchpad驱动。
 -
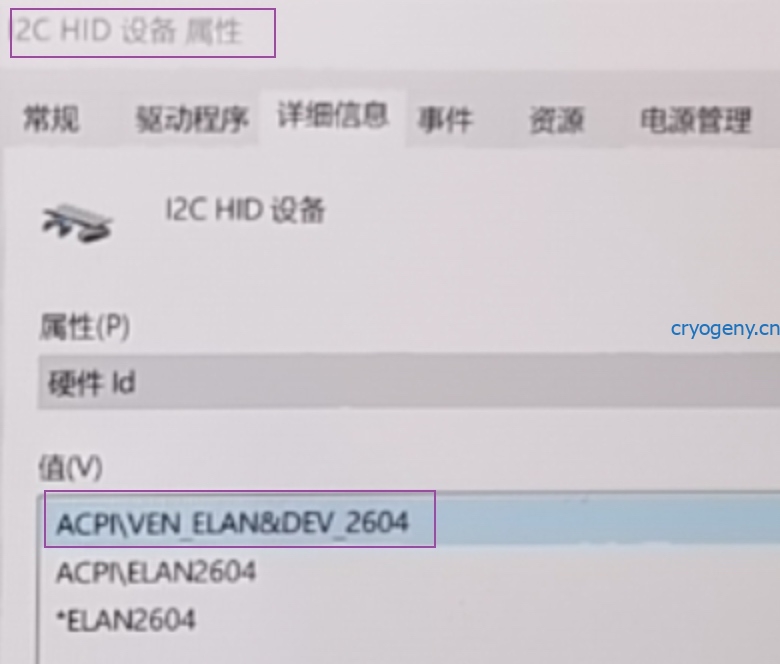
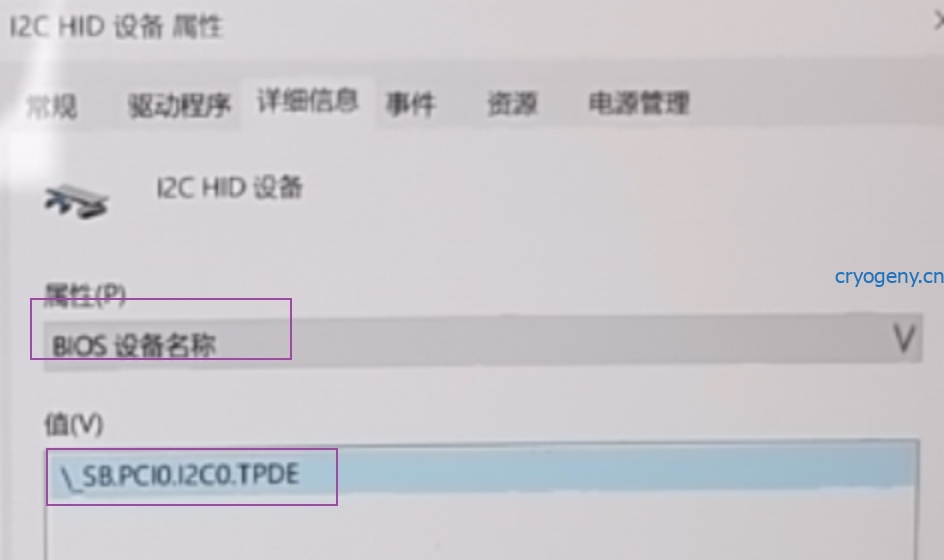
查看触摸板的硬件id和BIOS设备名称,bios设备名称在后续的dsdt中会需要用到
-
-
-
在macos 下使用hackintosh查看 触摸板的设备地址,获得类似PciRoot(0x0)/Pci(0x15,0x0) 之类的地址信息
DSDT的修改
-
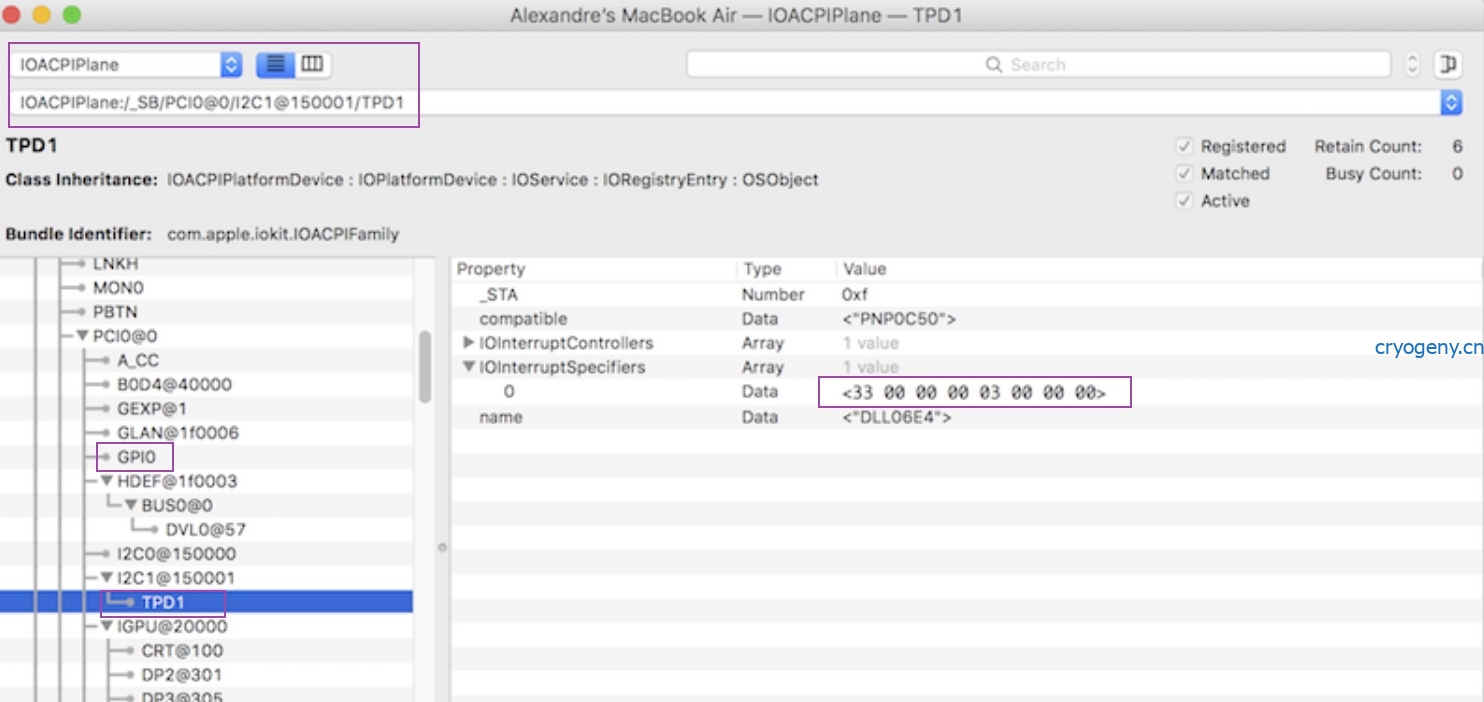
确定设备路径和APCI pin值
在没有安装VoodooI2C 的情况下,打开IORegistryExplorer,浏览对应的BIOS设备名称,定位到IOInterrruptSpecifiers项目,其最前面两位数为APIC pin值,是修改DSDT的重要依据
例1
例2
如果没有这一项,或者APIC pin值小于等于2F (10进制47),直接到驱动安装步骤。
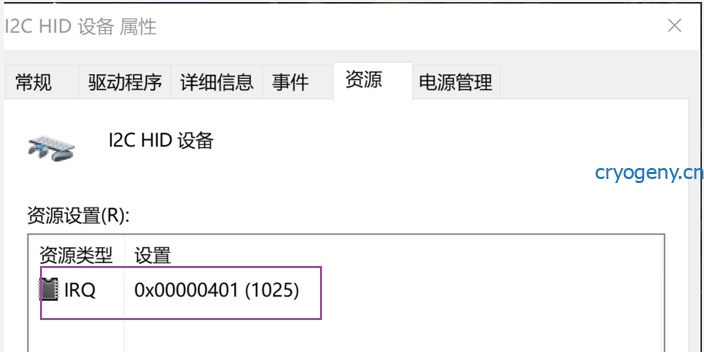
也可以在windows下查看APIC pin值 0x402(10进制 1025),得到其大于2f,需要GPIO中断模式
SBFI
采用MaciASL打开DSDT文件,搜索SBFG或者触摸板设备名,定位到SBFI名称,
Method (_CRS, 0, Serialized)  // _CRS: Current Resource Settings
{
         Name (SBFI, ResourceTemplate ()
         {
                   I2cSerialBusV2 (0x0015, ControllerInitiated, 0x00061A80,
                              AddressingMode7Bit, "\\_SB.PCI0.I2C1",
                              0x00, ResourceConsumer, , Exclusive,
                               )
                   Interrupt (ResourceConsumer, Level, ActiveLow, Exclusive, ,, )
                   {
                               0x0000006D,
                   }
                })
                Return (SBFI)
}
做如下修改:
将SBFI更名为SBFB
删除Interrupt()函数
SBFG
定位到SBFG名称,这个名称可能在你的设备的根目录下(称之为 root pinned),也可能是在_CRS方法下(称之为 CRS pinned),在pin list 段下的数据如果不为0,我们就给加个前缀well ,即 well-root pinned & well-CRS pinned。这两种情况均称之为well-pinned,如果不能找到这个名称,称之为unpinned,找到但是pin list 数据为0 则为pinned ,但不是well-pinned。
- 找不到SBFG-> unpinned: 插入如下代码段
- 找到SBFG但pin list 为0 ->pinned,再在CRS()方法中如果能找到像这样的一行,则也是well-pinned;如果找不到,则需要手动计算获取pin list 值,如果没能计算得到可以试试0x0017 0x001b 0x0034 0x0055 这4个值看看
Return (ConcatenateResTemplate (SBFB, SBFG)) - 找到SBFG且pin list 不为0 ->well-pinned
-
Name (SBFG, ResourceTemplate ()
        {

            GpioInt (Edge, ActiveLow, ExclusiveAndWake, PullDefault, 0x0000,

                "\\_SB.PCI0.GPI0", 0x00, ResourceConsumer, ,

                )

                {   // Pin list

                    0x0000

                }

        })
CRS
改成如下情况:
Method (_CRS, 0, NotSerialized)  // _CRS: Current Resource Settings
{
    Return (ConcatenateResTemplate (I2CM (I2CX, BADR, SPED), SBFG))
  //Return (ConcatenateResTemplate (SBFB, SBFG))
}
制作SSDT并引用
- 拷贝definitionblock()
- 拷贝scope(_SB.PCI0.I2C0.xxxx) xxxx为设备名称
- 改名,将xxxx改成不冲突的其他名称
- 修改CRS,STA,SBFG等等,补丁内容也一并修改好
- 修改config.plist
##### 禁用原触摸板设备
再新建一个ssdt,禁用之
参考
### 带鱼屏驱动和hidpi
通常带鱼屏的默认分辨率是 3440*1440;而完成后结果如下
分辨率: 5120 x 2144
UI看起来类似: 2560 x 1072 @ 75.00Hz
数字看起来不是常规的分辨率,但效果的确是最好的;具体步骤如下 - 首先关闭
- 获取hidpi脚本 并运行
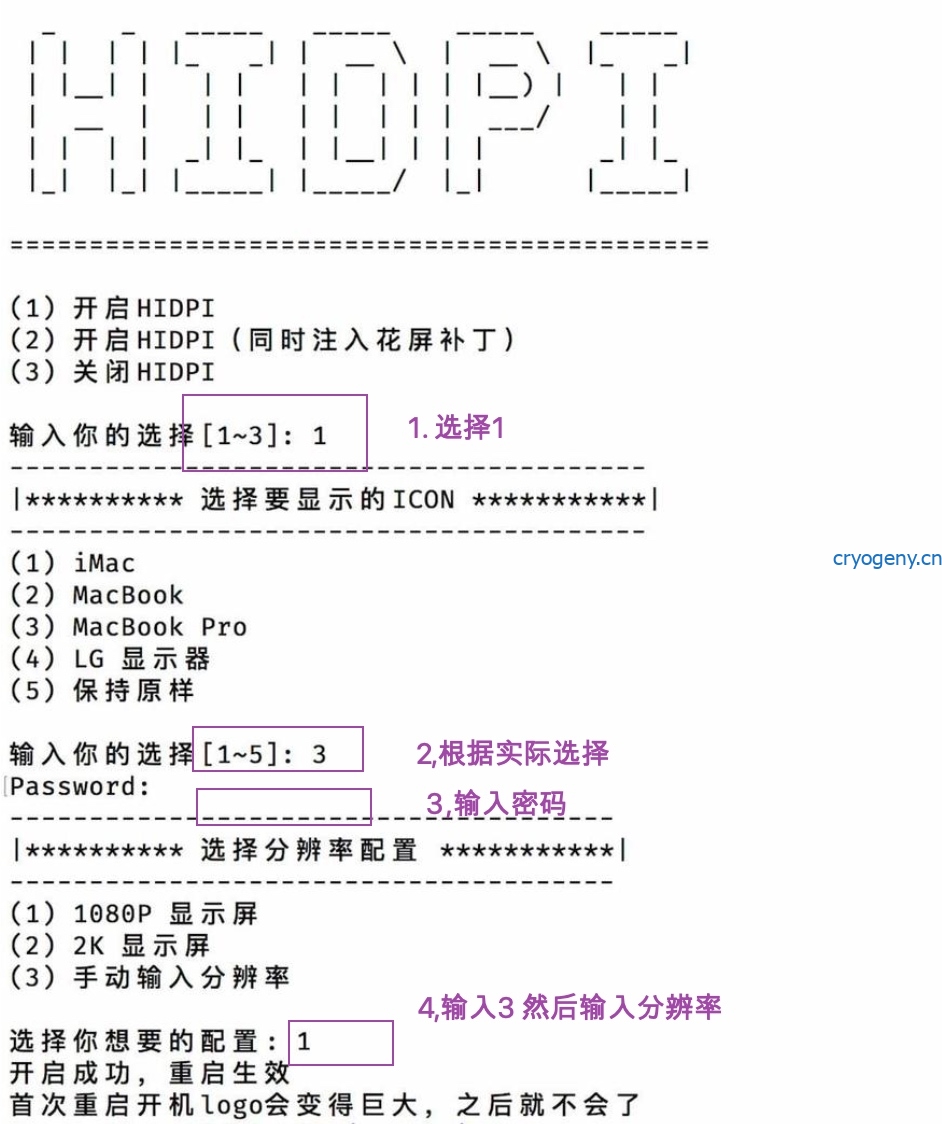
- 分辨率数值为 2560×1072 5120×2144 注意中间的x 是xyz的x 而不是✖️
- 下载RDM,选择分辨率2560×1072 即可
- 参考文件如下
https://www.jianshu.com/p/bcb0f04bfd96
http://avi.alkalay.net/software/RDM/
https://www.feng.com/post/11367567
A卡仿冒ID进行驱动流程
其实就是回答三个问题,你的GPU的ACPI路径是什么?准备将这个GPU仿冒成哪一个原生支持的GPU呢?怎么修改SSDT文件来达到仿冒的效果
- GPU的ACPI路径
在windows下打开设备管理器,选择显卡,右键单击显卡,属性,详细,查询 Locations Path

也有部分GPU需要选择BIOS 设备名称
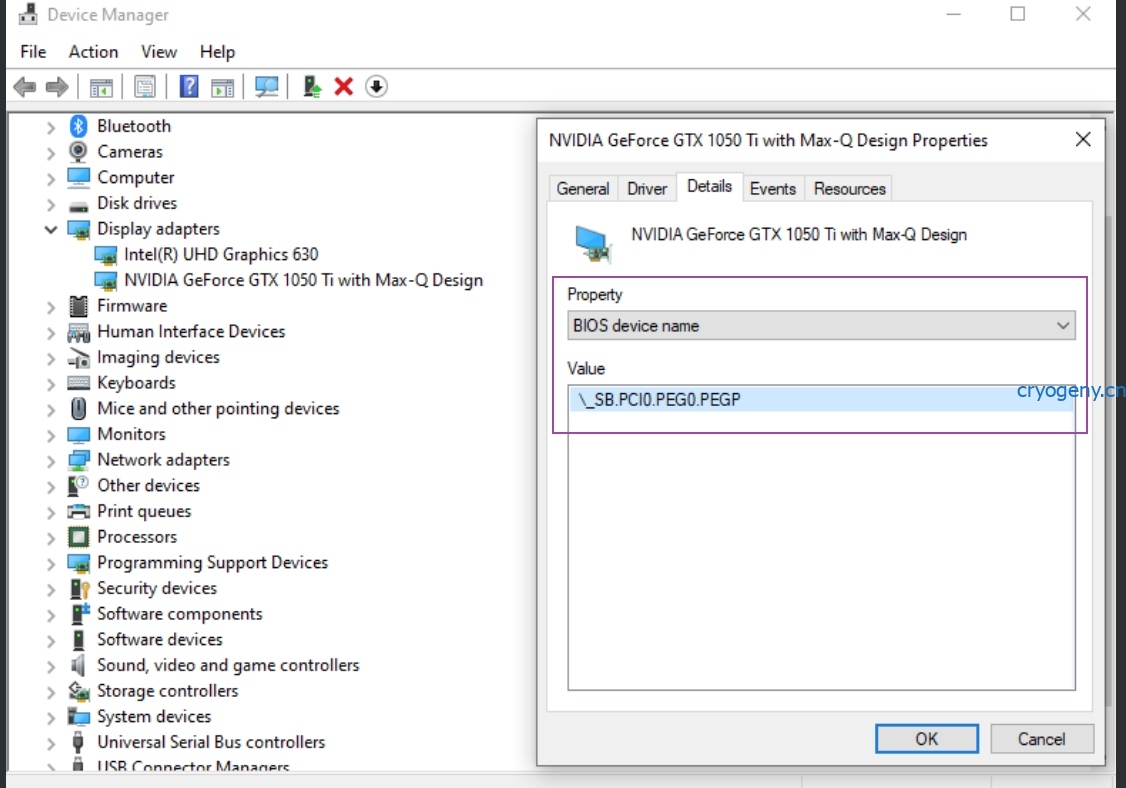
获取到ACPI路径为
ACPI(_SB_)#ACPI(PC02)#ACPI(BR2A)#ACPI(PEGP)#PCI(0000)#PCI(0000)
缩写为 _SB_.PC02.BR2A.PEGP
也可以在linux下执行命令获取
cat /sys/bus/pci/devices/0000:01:00.0/firmware_node/path
- 仿冒到哪一个GPU呢?
以R9 390为例,此卡不是原生支持,需要仿冒,很明显R9 390X就是最合适的仿冒对象,在PCI仓库 中可以查询到R9390X 的PCI ID 为
Vendor 1002 -> Device 1002:67b0
1002 代表AMD,所有AMD GPU均是此值
67B0 代表显卡的id,转换一下
"device-id",

Buffer (0x04)

{

 0xB0, 0x67, 0x00, 0x00

},
也可以在Linux 下运行以下命令得到
lspci -vmmnnD -d 1002::0300
以vendor 和 device 开头的两行尾部在 [ ] 中的数字即为相应的ID - 如果修改SSDT
先下载模板 SSDT-GPU-SPOOF
采用MaciASL打开此文件,内容如下
// Based off of WhateverGreen's sample.dsl
// https://github.com/acidanthera/OpenCorePkg/tree/master/Docs/AcpiSamples/Source/Sample.dsl
DefinitionBlock ("", "SSDT", 2, "DRTNIA", "AMDGPU", 0x00001000)
{
    External (_SB_.PCI0, DeviceObj)
    External (_SB_.PCI0.PEG0.PEGP, DeviceObj)


    Scope (\_SB_.PCI0.PEG0.PEGP)
    {
        if (_OSI ("Darwin"))
        {
            Method (_DSM, 4, NotSerialized)  // _DSM: Device-Specific Method
            {
                Local0 = Package (0x04)
                {
                    // Where we shove our FakeID
                    "device-id",
                    Buffer (0x04)
                    {
                        0xB0, 0x67, 0x00, 0x00
                    },

                    // Changing the name of the GPU reported, mainly cosmetic
                    "model",
                    Buffer ()
                    {
                        "AMD Radeon R9 390"
                    }
                }
                DTGP (Arg0, Arg1, Arg2, Arg3, RefOf (Local0))
                Return (Local0)
            }
        }
    }
    Scope (\_SB.PCI0)
    {
        Method (DTGP, 5, NotSerialized)
        {
            If (LEqual (Arg0, ToUUID ("a0b5b7c6-1318-441c-b0c9-fe695eaf949b")))
            {
                If (LEqual (Arg1, One))
                {
                    If (LEqual (Arg2, Zero))
                    {
                        Store (Buffer (One)
                            {
                                 0x03
                            }, Arg4)
                        Return (One)
                    }

                    If (LEqual (Arg2, One))
                    {
                        Return (One)
                    }
                }
            }

            Store (Buffer (One)
                {
                     0x00
                }, Arg4)
            Return (Zero)
        }

    }

}
ctrl+F 勾选替换,将 PCI0 更换成PC02 将PEG0 更换成BR2A

然后相应修改其中的device-id 和 model字段

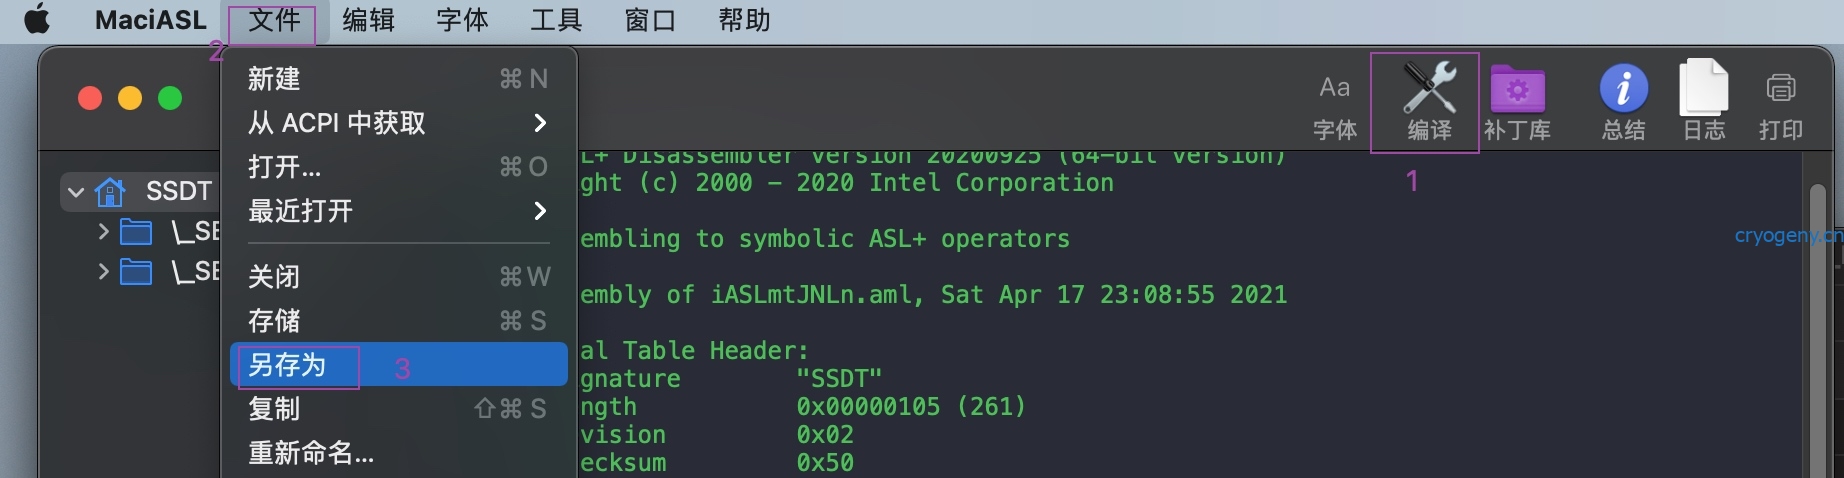
进行编译,存储为aml文件,可以手动改名
使用hackintosh处理驱动问题
iGPU核显驱动
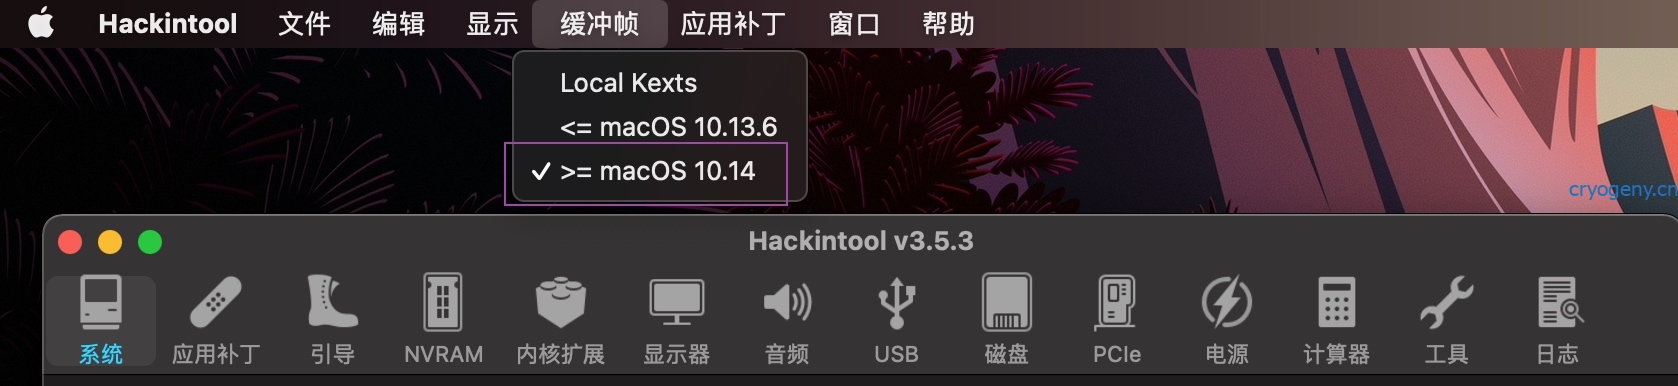
运行hackintosh工具,首选点击缓冲帧,根据系统版本相应进行选择,11.2版本当然是勾选>=10.14
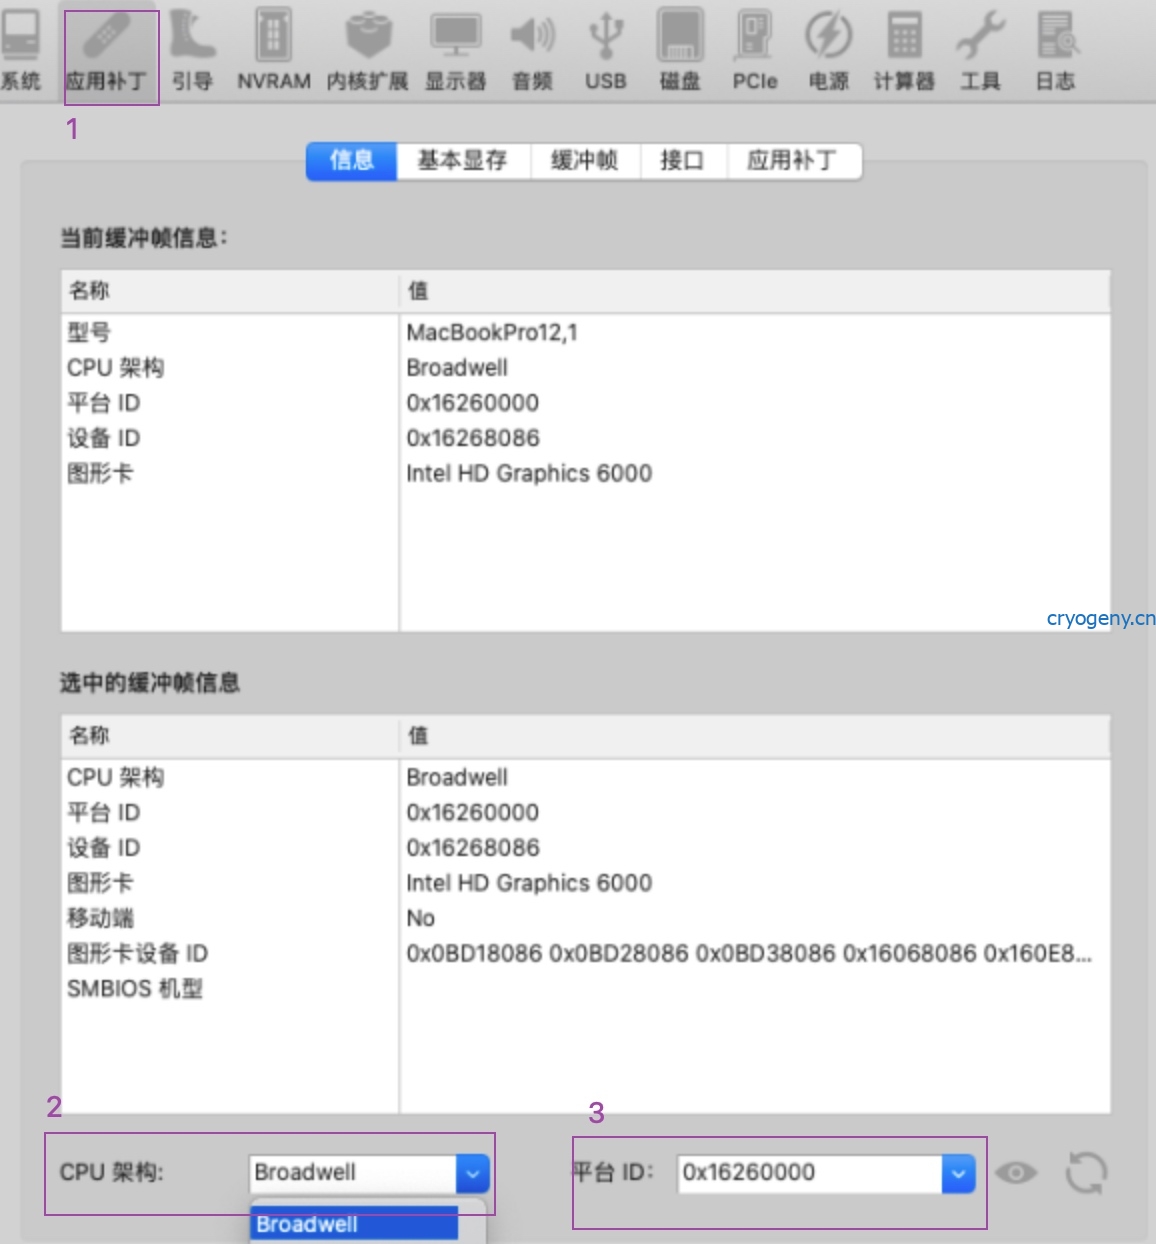
进入 应用补丁,选择对应的CPU架构和平台id,这个平台id即 platform-id,0x开头,正序
如果不了解选哪个平台id,参考intel核显列表清单,或者采用gfxutil工具查看获取
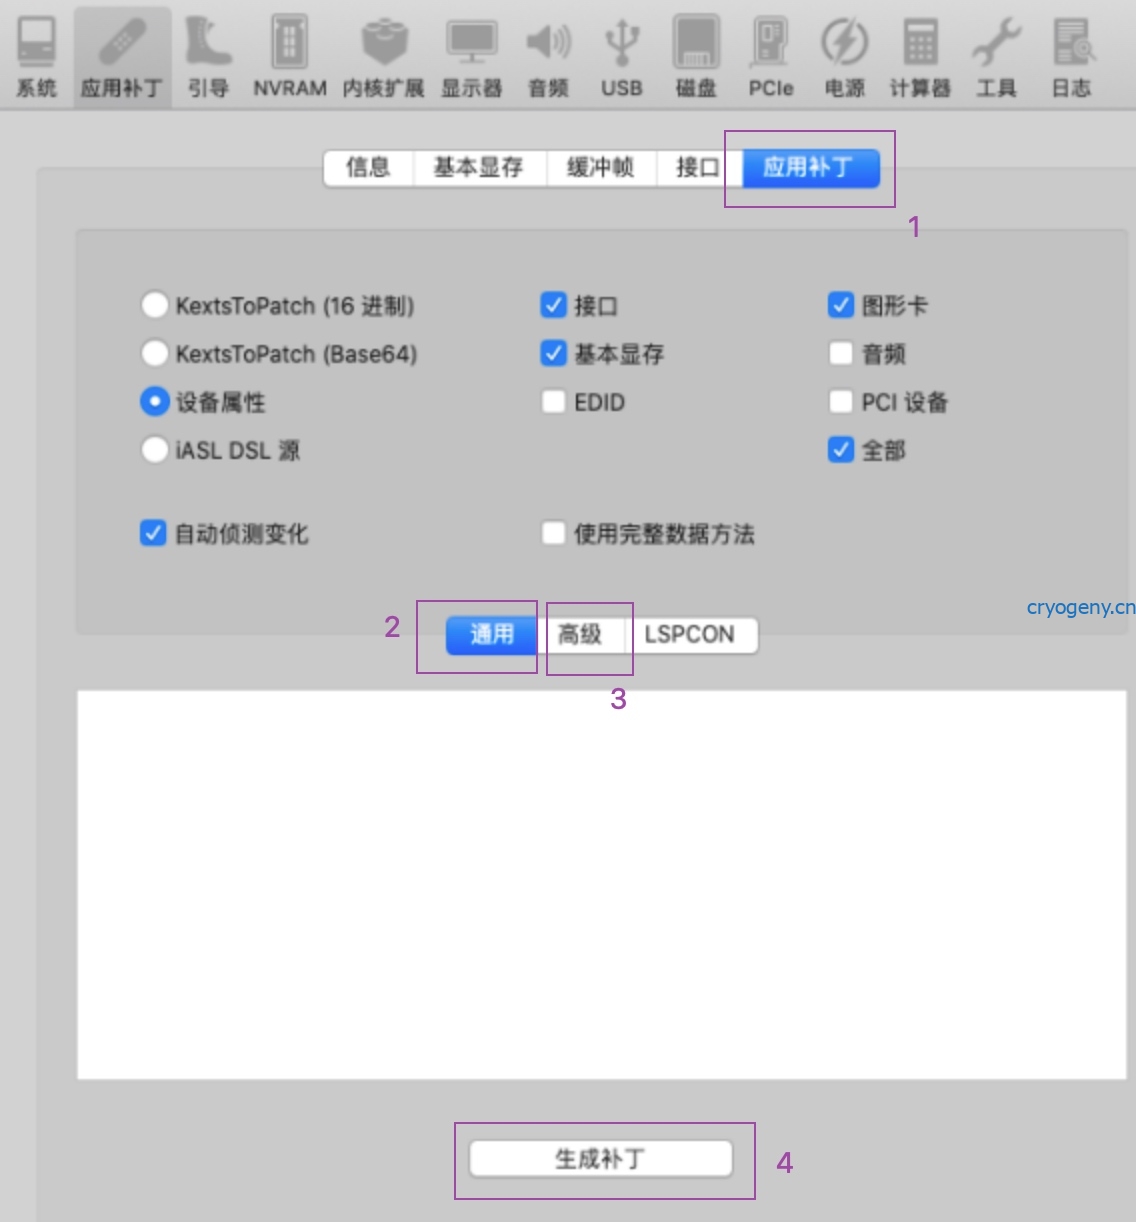
在应用补丁的通用和高级中相应进行选择,生成补丁
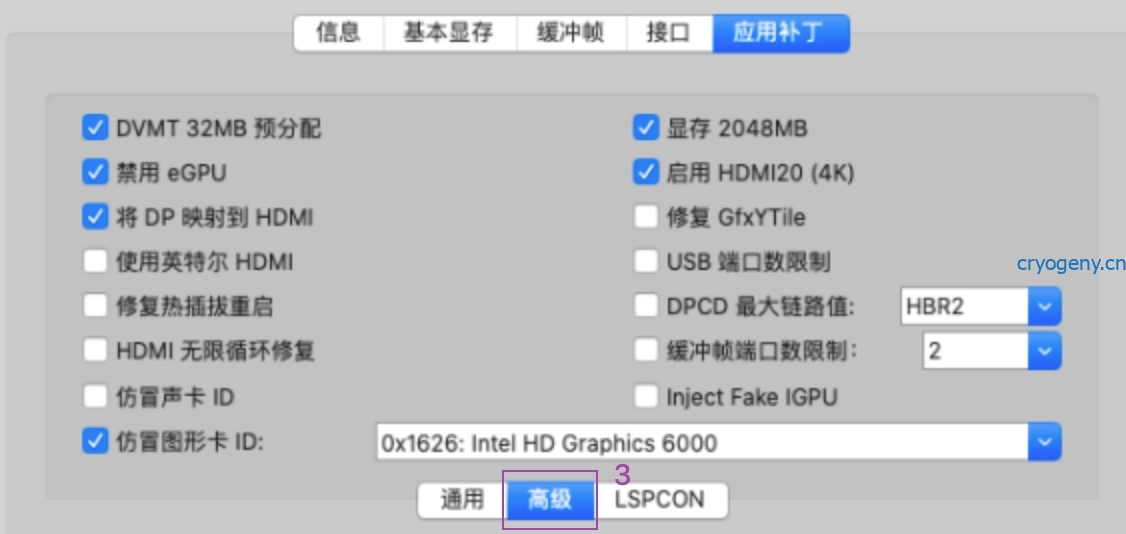
采用properTree合并导出的补丁到 deviceproperties 中
留意生成的补丁是0x正序形式,用在opencore中药相应调整次序
UHD630驱动显示7MB问题
设置iMac19,1 正确设置framebuffer即可
Ivy Xeon E3-1225v2核显P4000仿冒HD4000的方法
需要imei device-id PciRoot(0x0)/ Pci(0x16,0x0) 3A1C0000/3A1E0000
PciRoot(0x0)/ Pci(0x2,0x0)
AAPL,ig-platform-id 0A006601
device-id 01660000
Haswell E3-1285LV3 P4600核显驱动
device-id 12040000
APPL,ig-platform-id 0x1204000B /0B000412
主板BIOS调整显存到64M或者1024M
主板如果设置了64M或者1024M,则platform-id不需要设置framebuffer信息
否则应该设置framebuffer系列参数
设置机型和platform-id
UHD630是coffee lake系列所带核显,8代机型本来应该选macmini8,1,但实践有很多会黑屏,选iMac18,3时可进系统,选iMac19,1 加正确platform-id 07009B3E或者00009B3E
定制声卡驱动AppleALC
声卡layout-id 速查表
| Vendor | Codec | Revisions and layouts | MinKernel | MaxKernel |
|---|---|---|---|---|
| AnalogDevices | AD1984 | 0x100400, layout 11 | 13 (10.9) | — |
| AnalogDevices | AD1984A | 0x100400, layout 11, 13, 44 | 13 (10.9) | — |
| AnalogDevices | AD1988A | layout 12 | 13 (10.9) | — |
| AnalogDevices | AD1988B | layout 5, 7, 12 | 13 (10.9) | — |
| AnalogDevices | AD2000B | layout 5, 7 | 13 (10.9) | — |
| Realtek | ALC1150 | 0x100001, layout 1, 2, 3, 5, 7, 99 | 12 (10.8) | — |
| Realtek | ALC1220 | 0x100101, 0x100003, layout 1, 2, 3, 5, 7, 11, 13, 15, 16, 21, 27, 28, 29, 30, 34, 99 | 12 (10.8) | — |
| Realtek | ALC215 | 0x100002, layout 18 | 13 (10.9) | — |
| Realtek | ALC221 | 0x100003, 0x100103, layout 11, 15, 88 | 12 (10.8) | — |
| Realtek | ALC222 | 0x100001, layout 11 | 12 (10.8) | — |
| Realtek | ALC225/ALC3253 | layout 28, 30, 33, 90 | 13 (10.9) | — |
| Realtek | ALC230 | layout 13, 20 | 13 (10.9) | — |
| Realtek | ALC233/ALC3236 | 0x100003, layout 3, 4, 5, 13, 21, 27, 28, 29, 32, 33 | 13 (10.9) | — |
| Realtek | ALC235 | layout 3, 11, 12, 14, 15, 16, 17, 18, 21, 22, 24, 28, 35, 37, 99 | 13 (10.9) | — |
| Realtek | ALC236 | 0x100001, 0x100002, layout 3, 11, 12, 13, 14, 15, 16, 18, 54, 99 | 13 (10.9) | — |
| Realtek | ALC245 | layout 11, 12, 13 | 13 (10.9) | — |
| Realtek | ALC255/ALC3234 | layout 3, 11, 13, 15, 17, 18, 20, 21, 27, 28, 29, 30, 31, 66, 71, 86, 99, 100 | 13 (10.9) | — |
| Realtek | ALC256/ALC3246 | 0x100002, layout 5, 11, 13, 14, 16, 17, 19, 21, 22, 23, 28, 56, 57, 66, 67, 69, 76, 77, 88, 97 | 13 (10.9) | — |
| Realtek | ALC257 | 0x100001, layout 11, 18, 86, 99, 100 | 13 (10.9) | — |
| Realtek | ALC260 | layout 11, 12 | 13 (10.9) | — |
| Realtek | ALC262 | 0x100100, 0x100302, 0x100202, layout 7, 11, 12, 13, 28, 66 | 12 (10.8) | — |
| Realtek | ALC268 | layout 3 | 13 (10.9) | — |
| Realtek | ALC269/ALC271X | 0x100203, 0x100004, 0x100202, 0x100100, layout 1, 2, 3, 4, 5, 6, 7, 8, 9, 10, 11, 12, 13, 14, 15, 16, 17, 18, 19, 20, 21, 22, 23, 24, 27, 28, 29, 30, 32, 33, 35, 40, 44, 45, 47, 55, 58, 66, 76, 77, 88, 91, 93, 99, 100, 127, 128, 188 | 12 (10.8) | — |
| Realtek | ALC270 | 0x100100, layout 3, 4, 21, 27, 28 | 13 (10.9) | — |
| Realtek | ALC272 | 0x100001, 0x100002, layout 3, 12, 18, 21 | 13 (10.9) | — |
| Realtek | ALC274 | 0x100004, layout 21, 28, 35 | 13 (10.9) | — |
| Realtek | ALC275 | 0x100008, 0x100005, layout 3, 13, 28 | 13 (10.9) | — |
| Realtek | ALC280 | layout 3, 4, 11, 13, 15, 16, 17, 21 | 13 (10.9) | — |
| Realtek | ALC282 | 0x100003, layout 3, 4, 13, 22, 27, 28, 29, 41, 43, 51, 76, 86, 127 | 12 (10.8) | — |
| Realtek | ALC283 | layout 1, 3, 11, 13, 15, 44, 45, 66, 88 | 13 (10.9) | — |
| Realtek | ALC284 | layout 3 | 13 (10.9) | — |
| Realtek | ALC285 | layout 11, 21, 31, 52, 61, 71 | 13 (10.9) | — |
| Realtek | ALC286 | 0x100002, 0x100003, layout 3, 11 | 13 (10.9) | — |
| Realtek | ALC287 | layout 11 | 13 (10.9) | — |
| Realtek | ALC288 | layout 3, 13, 23 | 13 (10.9) | — |
| Realtek | ALC289 | layout 11, 15, 23, 87, 99 | 13 (10.9) | — |
| Realtek | ALC290/ALC3241 | layout 3, 4, 10, 15, 28 | 13 (10.9) | — |
| Realtek | ALC292 | layout 12, 15, 18, 28, 32, 55 | 13 (10.9) | — |
| Realtek | ALC293 | layout 11, 28, 29 | 13 (10.9) | — |
| Realtek | ALC294 | layout 11, 12, 13, 21, 22, 28, 66 | 13 (10.9) | — |
| Realtek | ALC295 | layout 1, 3, 13, 14, 15, 21, 22, 23, 24, 28, 77 | 13 (10.9) | — |
| Realtek | ALC298 | 0x100101, 0x100103, layout 3, 11, 13, 16, 21, 22, 28, 29, 30, 32, 47, 66, 72, 99 | 13 (10.9) | — |
| Realtek | ALC299 | 0x100002, layout 21, 22 | 13 (10.9) | — |
| Realtek | ALC662 | 0x100101, 0x100300, layout 5, 7, 11, 12, 13, 15, 16, 17, 18, 66 | 13 (10.9) | — |
| Realtek | ALC663 | 0x100001, 0x100002, layout 3, 4, 15, 28, 99 | 13 (10.9) | — |
| Realtek | ALC665 | layout 12, 13 | 13 (10.9) | — |
| Realtek | ALC668 | 0x100003, layout 3, 20, 27, 28, 29 | 13 (10.9) | — |
| Realtek | ALC670 | 0x100002, layout 12 | 13 (10.9) | — |
| Realtek | ALC671 | layout 12, 15, 16, 88 | 13 (10.9) | — |
| Realtek | ALC700 | layout 11 | 13 (10.9) | — |
| Realtek | ALC882 | layout 5, 7 | 13 (10.9) | — |
| Realtek | ALC883 | 0x100002, layout 7 | 13 (10.9) | — |
| Realtek | ALC885 | 0x100101, 0x100103, layout 1, 12, 13, 15, 48, 50, 53, 56, 58, 60, 62, 63, 64, 65, 67, 70, 73, 74 | 13 (10.9) | — |
| Realtek | ALC887 | 0x100202, 0x100302, layout 1, 2, 3, 5, 7, 11, 12, 13, 17, 18, 20, 33, 40, 50, 52, 53, 87, 99 | 13 (10.9) | — |
| Realtek | ALC888/ALC1200 | 0x100001, 0x100101, 0x100202, 0x100302, layout 1, 2, 3, 4, 5, 7, 11, 27, 28, 29 | 13 (10.9) | — |
| Realtek | ALC889 | 0x100004, layout 1, 2, 3, 11, 12 | 13 (10.9) | — |
| Realtek | ALC891/ALC867 | 0x100002, layout 11, 13 | 12 (10.8) | — |
| Realtek | ALC892 | 0x100302, layout 1, 2, 3, 4, 5, 7, 12, 15, 16, 17, 18, 20, 22, 28, 31, 90, 92, 97, 99, 100 | 13 (10.9) | — |
| Realtek | ALC897 | 0x100402, layout 66, 69 | 13 (10.9) | — |
| Realtek | ALC898/ALC899 | 0x100003, layout 1, 2, 3, 5, 7, 11, 13, 65, 66, 98, 99, 101 | 13 (10.9) | — |
| Realtek | ALCS1200A | 0x100001, layout 1, 2, 3, 11, 49, 50, 51 | 12 (10.8) | — |
| Realtek | ALCS1220A | layout 1, 2, 3, 5, 7, 11, 20, 21 | 12 (10.8) | — |
| Creative | CA0132 | 0x100918, layout 0, 1, 2, 3, 4, 5, 6, 7, 9, 10, 11, 12, 99 | 13 (10.9) | — |
| CirrusLogic | CS4206 | 0x100103, 0x100301, 0x100302, layout 1, 3, 9, 11, 13, 18, 24, 28, 29, 31, 32, 33, 35, 39, 61, 71, 75, 76, 77, 78, 79, 81, 91, 98, 99 | — | — |
| CirrusLogic | CS4210 | 0x100101, layout 13 | 13 (10.9) | — |
| CirrusLogic | CS4213 | 0x100100, layout 28 | 13 (10.9) | — |
| Conexant | CX20561 | 0x100000, layout 11 | 13 (10.9) | — |
| Conexant | CX20583 | layout 3 | 13 (10.9) | — |
| Conexant | CX20585 | layout 3, 13 | 13 (10.9) | — |
| Conexant | CX20588 | layout 3 | 13 (10.9) | — |
| Conexant | CX20590 | 0x100000, 0x100002, 0x100003, layout 3, 12, 13, 14, 28 | 13 (10.9) | — |
| Conexant | CX20632 | 0x100100, layout 20, 23, 28 | 13 (10.9) | — |
| Conexant | CX20641 | layout 11, 13 | 13 (10.9) | — |
| Conexant | CX20642 | layout 11, 13 | 13 (10.9) | — |
| Conexant | CX20722 | layout 3 | 13 (10.9) | — |
| Conexant | CX20724 | layout 3, 13 | 13 (10.9) | — |
| Conexant | CX20751/CX20752 | 0x100100, 0x100001, layout 3, 21, 28 | 13 (10.9) | — |
| Conexant | CX20753/CX20754 | layout 3, 14, 15, 21 | 13 (10.9) | — |
| Conexant | CX20755 | layout 3 | 13 (10.9) | — |
| Conexant | CX20756 | layout 3, 13 | 13 (10.9) | — |
| Conexant | CX20757 | layout 3, 28 | 13 (10.9) | — |
| Conexant | CX8050 | layout 3, 13 | 13 (10.9) | — |
| Conexant | CX8070/CX11880 | layout 15 | 13 (10.9) | — |
| Conexant | CX8150 | layout 21, 22 | 13 (10.9) | — |
| Conexant | CX8200 | layout 3, 15, 21, 23, 80 | 13 (10.9) | — |
| Conexant | CX8400 | layout 12 | 13 (10.9) | — |
| IDT | IDT92HD66C3/65 | layout 3 | 13 (10.9) | — |
| IDT | IDT92HD71B7X | layout 3 | 13 (10.9) | — |
| IDT | IDT92HD73C1X5 | layout 19, 21 | 13 (10.9) | — |
| IDT | IDT92HD73E1X5 | layout 15 | 13 (10.9) | — |
| IDT | IDT92HD75B2X5 | layout 3 | 13 (10.9) | — |
| IDT | IDT92HD75B3X5 | layout 3 | 13 (10.9) | — |
| IDT | IDT92HD81B1C5 | layout 3, 11 | 13 (10.9) | — |
| IDT | IDT92HD81B1X5 | layout 3, 11, 12, 20, 21, 28 | 13 (10.9) | — |
| IDT | IDT92HD87B1 | layout 3 | 13 (10.9) | — |
| IDT | IDT92HD87B1/3 | 0x100205, layout 12, 13 | 13 (10.9) | — |
| IDT | IDT92HD87B2/4 | layout 13 | 13 (10.9) | — |
| IDT | IDT92HD90BXX | layout 3, 12 | 13 (10.9) | — |
| IDT | IDT92HD91BXX | 0x100102, 0x100303, layout 3, 12, 13, 33, 84 | 13 (10.9) | — |
| IDT | IDT92HD93BXX | 0x100203, layout 12 | 13 (10.9) | — |
| IDT | IDT92HD95 | layout 11, 12, 14 | 13 (10.9) | — |
| IDT | IDT92HD99BXX | layout 3 | 13 (10.9) | — |
| SigmaTel | STAC9200 | 0x102201, layout 11 | 12 (10.8) | — |
| SigmaTel | STAC9872AK | 0x100201, layout 12 | 12 (10.8) | — |
| VIA | VT1705 | 0x100000, layout 21 | 13 (10.9) | — |
| VIA | VT1802 | 0x100000, layout 3, 33, 65 | 13 (10.9) | — |
| VIA | VT2020_2021 | 0x100100, layout 5, 7, 9, 13 | 13 (10.9) | — |
| Vendor | Patch for not native | Device | MinKernel | MaxKernel |
| NVIDIA | NVIDIA HDMI for GK208 in 10.13.4+ | 0x0E0F | 17 (10.13) | — |
| NVIDIA | NVIDIA HDMI for GM200 in 10.13.4 – 10.13.6 | 0x0FB0 | 17 (10.13) | 17 (10.13) |
| NVIDIA | NVIDIA HDMI for GP108 in 10.13.4 – 10.13.6 | 0x0FB8 | 17 (10.13) | 17 (10.13) |
| NVIDIA | NVIDIA HDMI for GP107 in 10.13.4 – 10.13.6 | 0x0FB9 | 17 (10.13) | 17 (10.13) |
| NVIDIA | NVIDIA HDMI for GM206 in 10.13.4 – 10.13.6 | 0x0FBA | 17 (10.13) | 17 (10.13) |
| NVIDIA | NVIDIA HDMI for GM204 in 10.13.4 – 10.13.6 | 0x0FBB | 17 (10.13) | 17 (10.13) |
| NVIDIA | NVIDIA HDMI for GM107 in 10.13.4 – 10.13.6 | 0x0FBC | 17 (10.13) | 17 (10.13) |
| NVIDIA | NVIDIA HDMI for GP102 in 10.13.4 – 10.13.6 | 0x10EF | 17 (10.13) | 17 (10.13) |
| NVIDIA | NVIDIA HDMI for GP104 in 10.13.4 – 10.13.6 | 0x10F0 | 17 (10.13) | 17 (10.13) |
| NVIDIA | NVIDIA HDMI for GP106 in 10.13.4 – 10.13.6 | 0x10F1 | 17 (10.13) | 17 (10.13) |
| AMD | AMD R9 290X HDMI | 0xAAC8 | 15 (10.11) | — |
| AMD | AMD R9 Fury HDMI Audio | 0xAAE8 | 15 (10.11) | — |
| AMD | AMD Vega-M HDMI | 0xAB08 | 15 (10.11) | — |
| AMDZEN | AMD Zen Audio Controller 0x1457 | 0x1457 | — | — |
| AMDZEN | AMD Zen Audio Controller 0x1487 | 0x1487 | — | — |
| AMDZEN | AMD Zen Audio Controller 0x15E3 | 0x15E3 | — | — |
| Intel | HD4600 HDMI Audio | 0x0C0C | 13 (10.9) | — |
| Intel | Atom Z36xxx/Z37xxx Audio Controller | 0x0F04 | 13 (10.9) | — |
| Intel | Z97 HDEF controller in 10.9 | 0x8CA0 | 13 (10.9) | 13 (10.9) |
| Intel | X99 HDEF controller 0x8D20 | 0x8D20 | 13 (10.9) | — |
| Intel | X99 HDEF controller 0x8D21 | 0x8D21 | 13 (10.9) | — |
| Intel | 100 Series (0xA170) Mobile PCH HD Audio | 0xA170 | 15 (10.11) | — |
| Intel | WhiskeyLake Mobile PCH HD Audio | 0x9DC8 | 16 (10.12) | — |
| Intel | 200 Series Mobile PCH HD Audio | 0xA171 | 16 (10.12) | — |
| Intel | 200 Series PCH HD Audio | 0xA2F0 | 16 (10.12) | — |
| Intel | 300 Series PCH HD Audio in 10.12 – 10.13 | 0xA348 | 16 (10.12) | 17 (10.13) |
| Intel | C620 Series PCH HD Audio | 0xA1F0 | 19 (10.15) | — |
| Intel | 400 Series(0xA3F0) PCH HD Audio | 0xA3F0 | 19 (10.15) | — |
| Intel | 400 Series PCH HD Audio | 0x06C8 | 19 (10.15) | — |
| Intel | 400 Series PCH-LP HD Audio | 0x02C8 | 19 (10.15) | — |
| Intel | Icelake Smart Sound Technology Audio Controller | 0x34C8 | 19 (10.15) | — |
| Intel | 500 Series(0xF0C8) PCH HD Audio | 0xF0C8 | 19 (10.15) | — |
| Intel | 500 Series(0x43C8) PCH HD Audio | 0x43C8 | 19 (10.15) | — |
AMD 平台声卡快速定制AppleALC
仅仅针对主板自带声卡生效,显卡带的声卡或者HDAU不会生效,有点像USBports.kext的定制方法
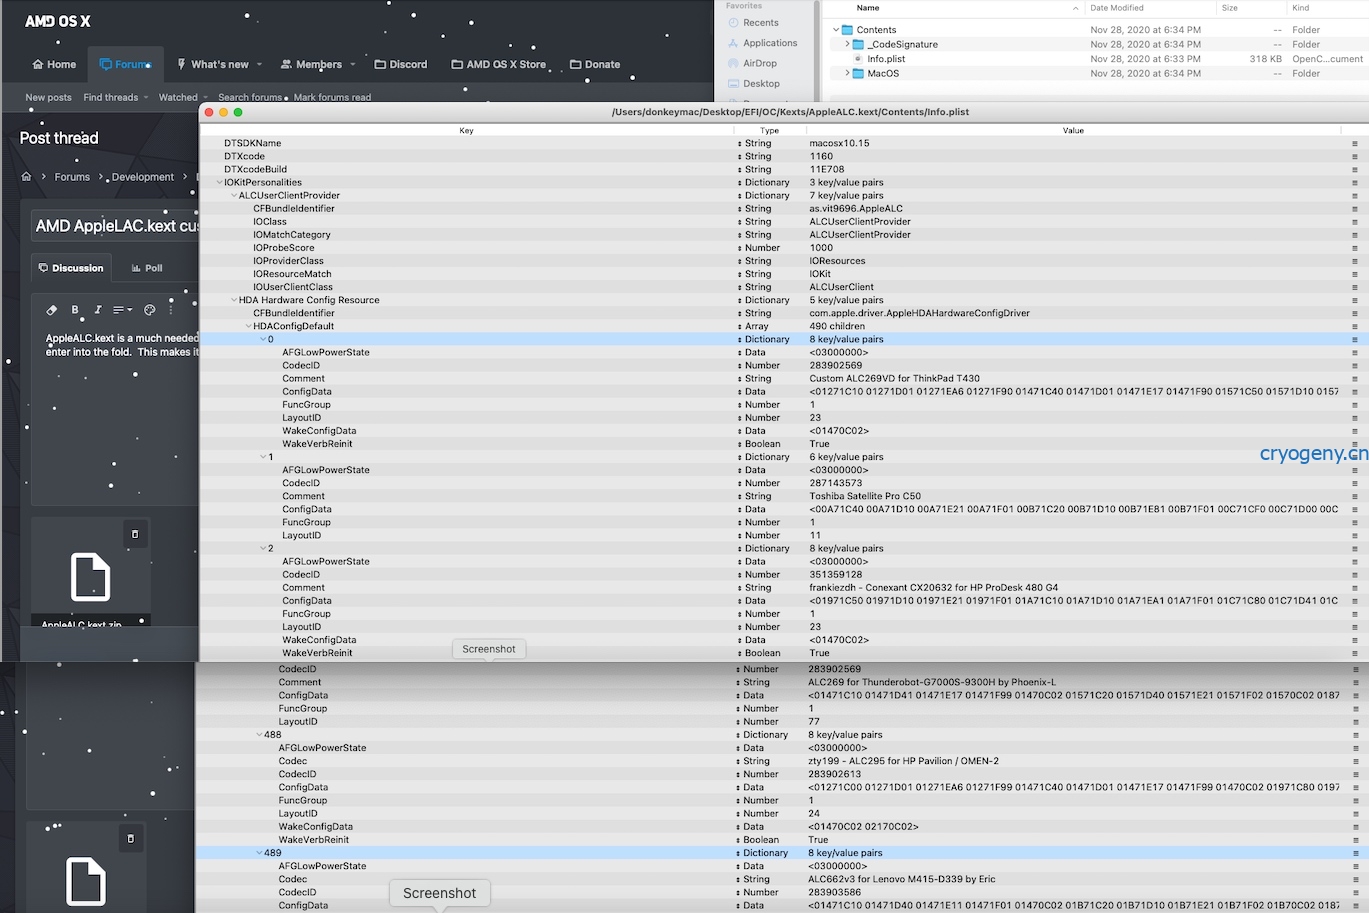
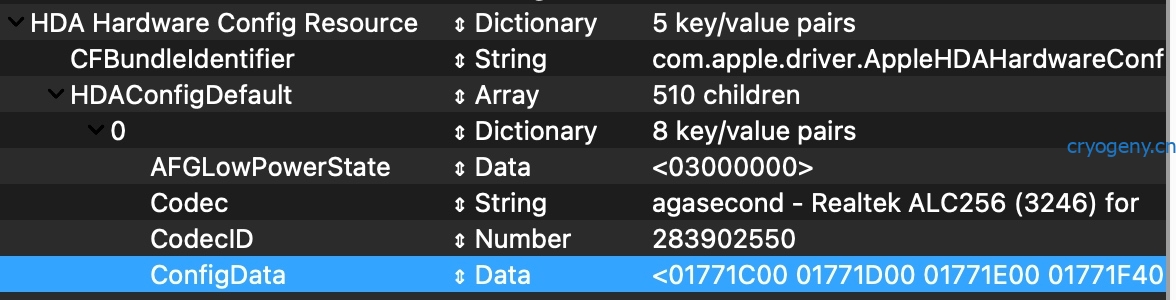
当前AppleALC.kext/Contents/Info.plist内容
Update #1 12/5: There is a way to get the raw codec using a USB and Clover 4988 or later.
Update #2 12/6: I added ALC887 for a MSi B450M PRO M2 MAX.
获取声卡codec文件
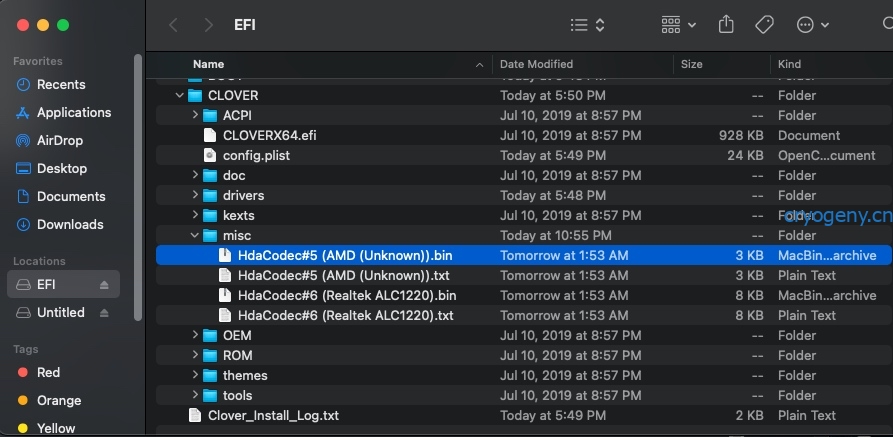
- 步骤一: 制作Clover引导盘,在clover界面按F8;得到codec位于/Clover/misc文件夹中, F4可以获取到DSDT文件,位于 EFI/Clover/ACPI/origin
- Download Clover rev. 4988 or newer
- Format a USB in Guid partition format.
- Install Clover to the USB, make sure to select the customize tab and choose UEFI install mode, also check drivers Audiodxe.efi.
- Shut down and disconnect SSD, HDD or disable NVME in bios.
- Boot into bios menu (Hold delete key) and select boot option UEFI PMAP selection.
-
At Clover menu hit the F8 key, then attempt a boot.
You should now have an audio codec for your system in Clover/misc. Folder.
-
步骤2 .
Reset your system, SSD, HDD or NVME and boot normally.
Plug in the USB and mount the EFI.
Navigate to Clover/ misc. folder and open. You should see the codec files in there one for ALC (Mobo) and the other for HDAU (Graphics HDMI).
Download PinConfigurator app. PinConfigurator 2.2.4
Open PinConfigurator go to top tool bar and select File>Open>EFI>Clover>misc.>ALC XXXX.bin, "Choose".

Save these values, you can paste them in Notes under a new page, or keep them in clipboard, for the next step.
Creating the New info.plist
-
步骤3.
Open AppleALC.kext by right clicking "Show Package Contents" open the "Contents" folder.
Right Click on info.plist and select open with Propertree (or other text editor).
Find the values for ConfigData.
Place the values for the ConfigData and save the info.plist edit..
-
步骤4 Testing the Kext
Install the edited version of AppleALC.kext in EFI/OC/Kexts folder and run OC Snapshot function using Propertree.
Reboot and open Hackintool to see if your audio is detected.
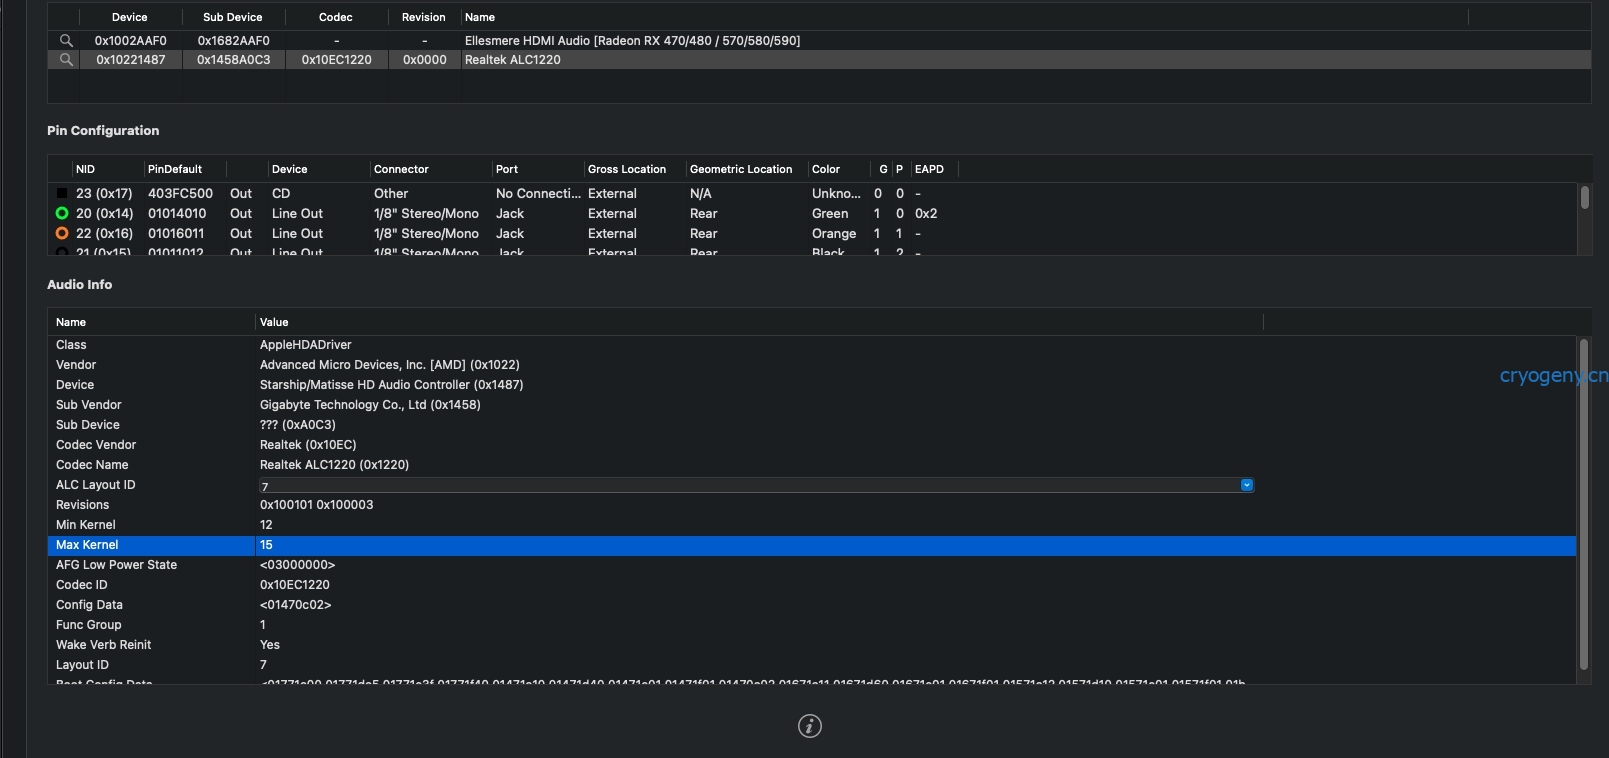
Now open PinConfigurator and go to top tool bar and select "Import" from IORegistry.
This should give you a screen like this.
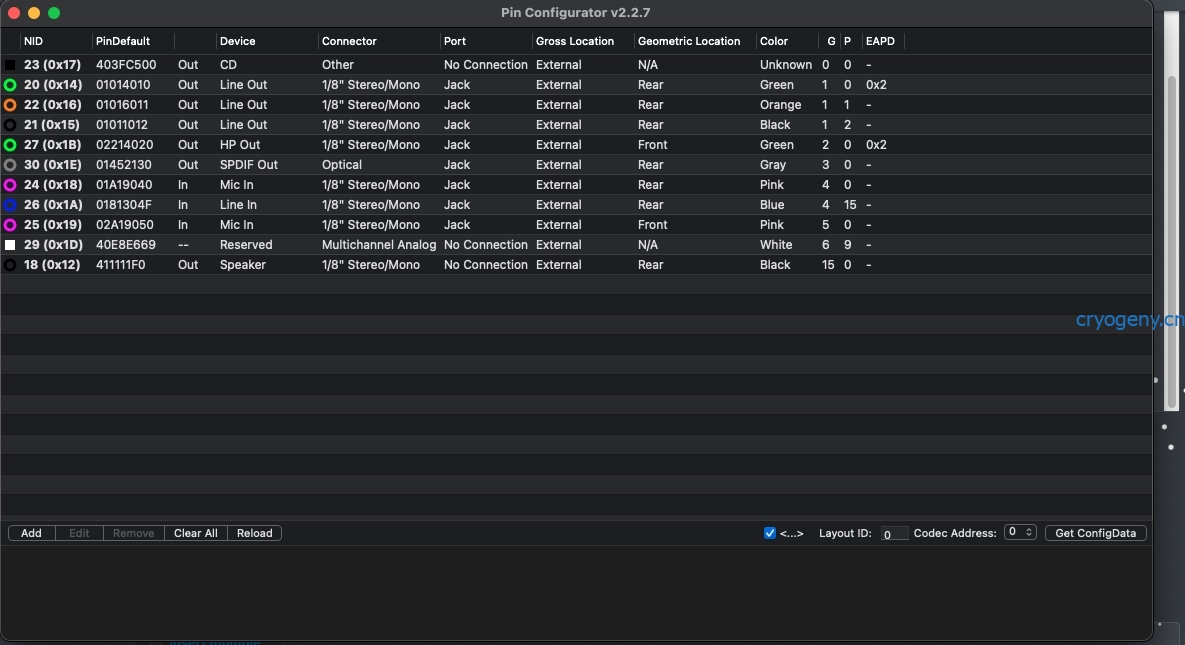
Double click on a selection and an edit window will appear.
Here you can edit the color, type of connector, internal vs external etc.
Once you have completed your edit you can use the config.data tab again which will give you new values. Follow the previous steps to replace the configdata in the info.plist as before.
Reboot to check if the edits took hold and display in Hackintool or PinConfigurator.
- 步骤5 Final Touch-Up Editing
Open the saved codec txt file and compare the Nodes, there are descriptions in this file that will describe the outputs and locations.
Continue to test and edit your configuration until you have as many options working as you need.
Upload the info.plist andI will add it to the master AMD-AppleALC.kext attached.
文件准备
-
声卡codec
- 制作Ubuntu安装U盘并引导启动电脑,选择try Ubuntu without installing
- 复制card0[台式机]或者card1[笔记本] /proc/asound/card1/codec* 到其他磁盘
- 进入macOS,将提取的codec.txt改名为codec_dump.txt 与verbit程序同目录
- 执行以下命令
./verbit codec_dump.txt > verbs.txt- 如果遇到报错,分开执行命令。如果遇到文件内容有AFG Function Id:0x1(unsol 1) 的字样,需要删除codec_dump.txt的这行数据,同时删除空格,再执行一次命令,以得到正确的verbs.txt
-
-
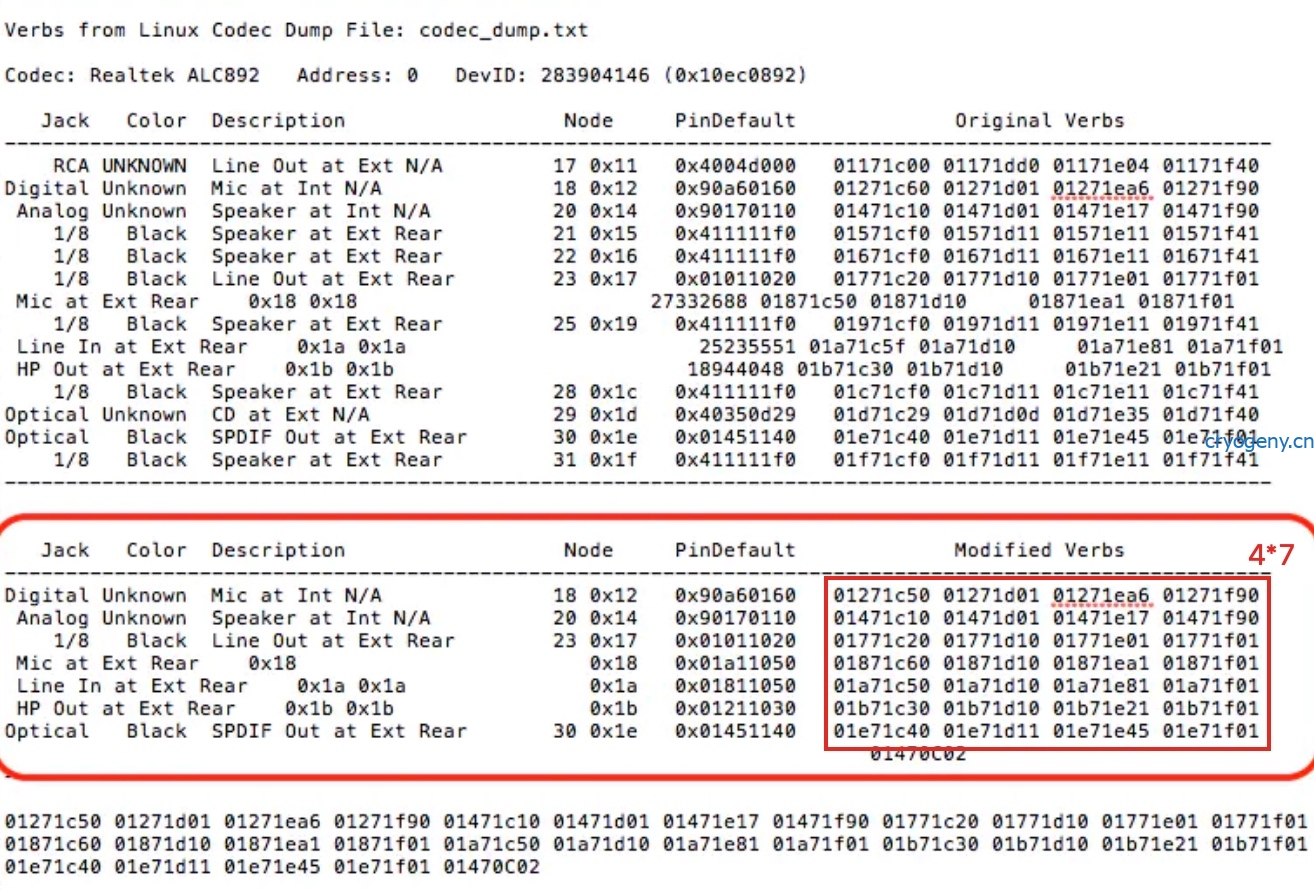
打开codec.txt搜索上面的红框中的Node,找到每个Node下面的Pin Default那行,看看中间是否有[N/A],将有[N/A]的“节点信息”中的一行删除。
-
删除后,红框中的modified verbs每行四个数,一共7组就是需要的configdata(codec.txt内搜索EAPD字样,存在EAPD,必须在configdata中该接口最后加入一组01470C02)
-
声卡的configdata和节点信息
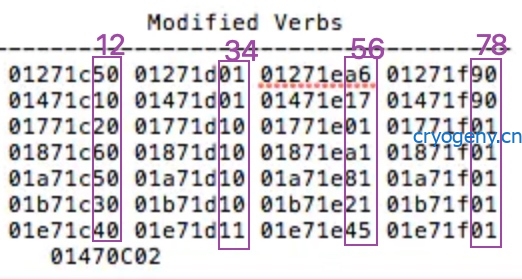
- 参考图,纵向
-
-
第1组:接口优先级
- 下图中的紫框标识的是接口优先级,数字越低那么优先权就越高。如果有[N/A]的接口机是无用的接口可以设成 f。
-
第2组:将line-out设置为f,其余为0 ,没有line-out则全部为0
-
第3组:接口颜色,默认就行
0 = Unknown
1 = Black

2 = Grey

3 = Blue

4 = Green

5 = Red

6 = Orange

7 = Yellow

8 = Purple

9 = Pink

A - D = Reserved

E = White

F = Other -
第4组:接口为0标识被检测到时使用。如果是笔记本的话,内建的麦克风和扬声器要设置成1,即,当耳机插入时,内建扬声器静音。
-
第5组:接口功能信息,按照下列定义进行修改
0 = Line Out
1 = Speaker

2 = HP Out

3 = CD

4 = SPDIF Out

5 = Digital Other Out

6 = Modem Line Side

7 = Modem Handset Side

8 = Line In

9 = AUX

A = Mic In

B = Telephone

C = SPDIF In

D = Digital Other In

E = Reserved

F = Other -
第6组:链接装置类型
0 = Unknown
1 = 1/8" stereo/mono

2 = 1/4' stereo/mono

3 = ATAPI internal

4 = RCA

5 = Optical

6 = Other Digital

7 = Other Analog

8 = Multichannel Analog (DIN)

9 = XLR/Professional

A = RJ-11 (Modem)

B = Combination

F = Other

通常接口是 1/8" stereo/mono,SPDIF 是 Optical。笔记本内建的接口是 ATAPI internal。(这只是描述,对驱动没有本质影响,我默认没有修改。) -
第7组: 0 为插入接口的,如外置麦克风与耳机,9 为笔记本内置,比如内置扬声器,内置麦克风
Mic at Int N/A =9
Speaker at Int N/A =9

line out =0

Mic at Ext Rear =0

Line In at Ext Rear =0

HP Out at Ext Rear =0

SPDIF Out at Ext Rear =0 -
第8组:插口所在位置
插口所在位置
0 = Rear(后)

1 = Front(前)

8=HDMI

9=ATAPI (內建)

(这只是描述,对驱动没有本质影响,我默认没有修改。) -
将八组数据修改后进行整理得到configdata值(每个参数中保留一位空格):
codec.txt内搜索EAPD,存在EAPD字样的接口后加入 0XX70C02(XX为接口名)01271c50 01271d01 01271ea6 01271f90 01471c10 01471d01 01471e17 01471f90 01470C02
01771c20 01771d10 01771e01 01771f01
01871c60 01871d10 01871ea1 01871f01
01a71c50 01a71d10 01a71e81 01a71f01
01b71c30 01b71d10 01b71e21 01b71f01 01b70C02
01e71c40 01e71d11 01e71e45 01e71f01
-
声卡的platform节点
-
推导节点:红框中为接口节点
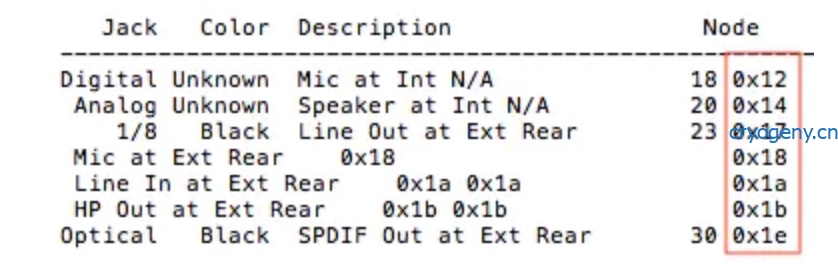
- ①输入以Mic at int(内置麦克风)为例在codec_dump.txt搜索0x12,
搜索到2个0x12,一个为节点本身即Node 0x12,一个在关联节点0x22下 


- 然后在codec_dump.txt搜索0x22,搜索到2个0x22,一个为节点本身即Node 0x22,一个在关联节点0x09下
-
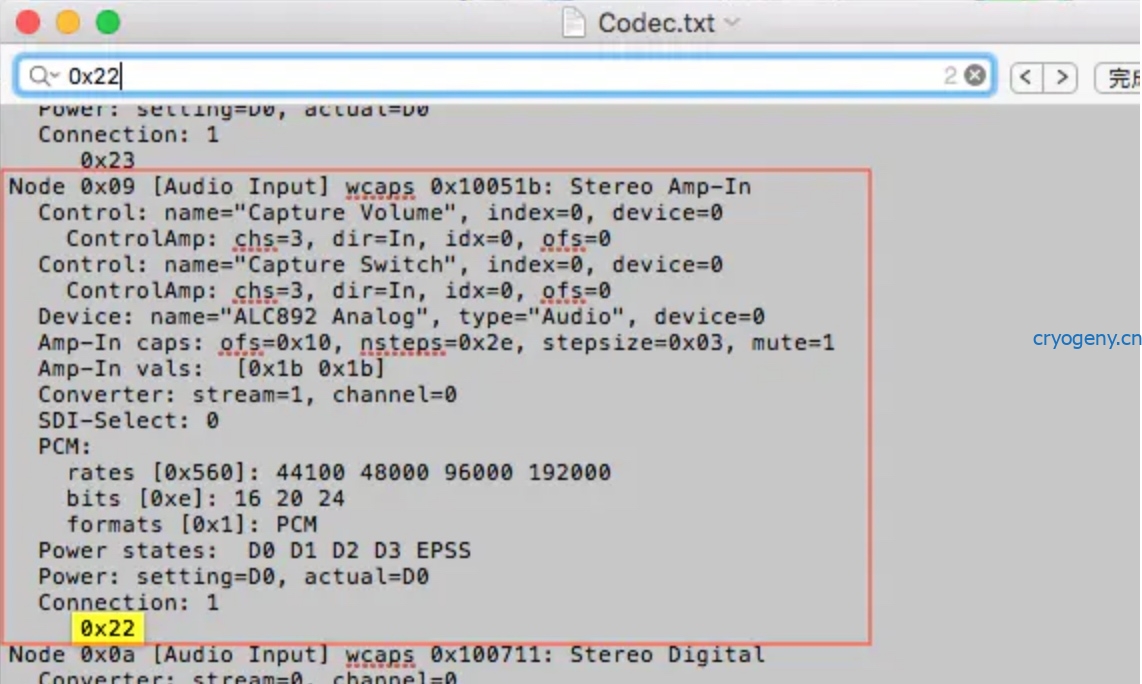

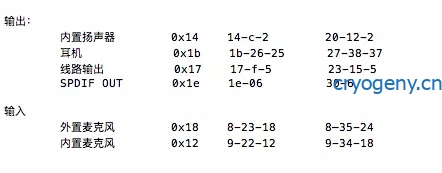
按照输入节点反向推导,获得内置麦克风的节点为:
十六进制:0x09 → 0x22 → 0x12

十进制:9 → 34 → 18 -
②输出以Speaker at Int N/A(内置扬声器)为例在codec_dump.txt搜索0x14,搜索到4个0x14,首先找到节点本身即Node 0x14
-

-
找到connection中有关联节点0x0c,在codec_dump.txt搜索0x0c,搜索到6个0x0c,首先找到节点本身即Node 0x0c
-
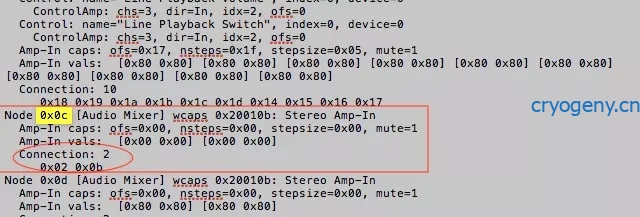
找到connection中有关联节点0x02,0x0b,在已选节点不重复的前提下,优先选择数字小,即0x02节点
按照输出节点正向推导,获得内置扬声器的节点为:
十六进制:0x14 → 0x0c → 0x02
十进制: 20 → 12 → 2
由此推导出所有节点,由于节点很多,可能出现有共同关联的节点,且没有其他节点,则更换上个节点,重新推导,直到没有重复的为止。
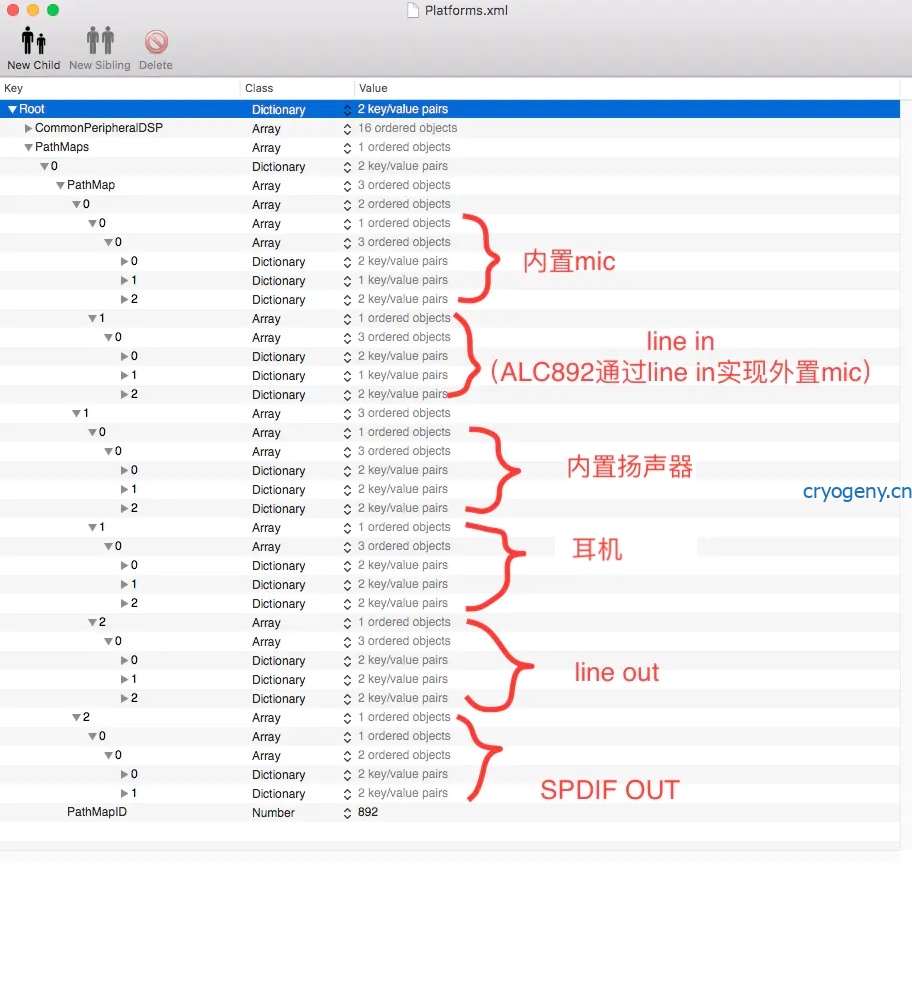
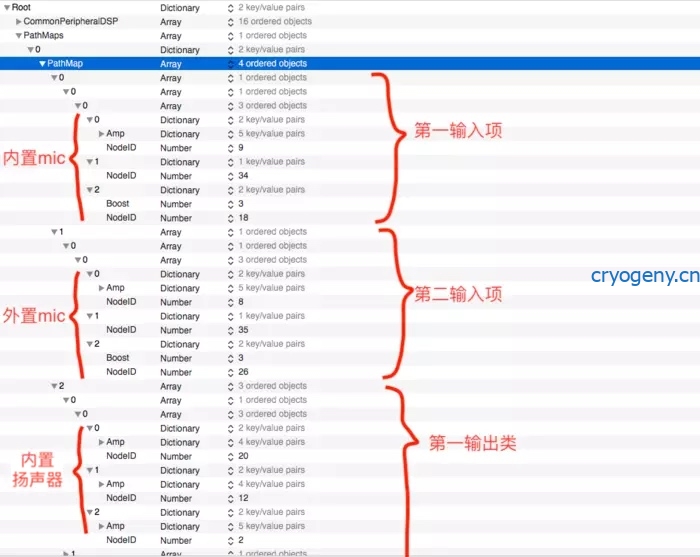
PathMap下一共三大项: 0为输入(第一输入项,外置mic可以实现自动切换的只需要一个输入项,无法实现的需要第二输入项),1为输出(第一输出项),2为SPDIF
输入项分为三大项:
0为内置mic,1为linein,2为外置mic(ALC892外置mic通过linein实现,由此删除外置mic项)
输出项分为三大项:
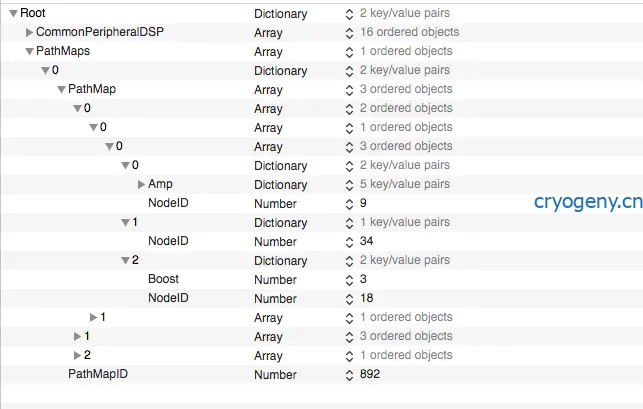
0为耳机,1为内置扬声器,2位lineout以内置mic为例:内置mic底层三项代表三个节点,将之前推导的三个节点按顺序输入到NodeID中,在内置mic节点添加boost项(设置电平增效数值为1、2、3,数值3最大),设置为3,可以减少mic杂音的情况(外置mic和linein的节点也可以添加boost项)
部分机器会出现插入外置mic不识别的情况,其实只是外置mic无法自动切换导致无法显示出来,需要调整将节点到第二类输入项中来实现手动切换,如图
-
-
AppleALC-master here
- Applealc-master——resources——alcxxx 中的info.Plist
用来描述你的声卡以及对layout和Platforms文件位置、id的说明
ALC892的codecID为283904146,这是0x10ec0892十六进制转换过来的。在codec_dump开头中可以找到,macos的计算器有进制转换功能。
然后修改layouts第一项,修改id为1,path地址改为你做好的layouts.xml.zlib文件,Platforms设置方式一样。(全篇LayoutID统一为1,也可统一为其他数字)

- Applealc-master——resources——pinconfigs.kext——contents中的info.Plist
集合了所有声卡的信息,我们只用保留需要的,为防止冲突,只修改第一项,其他都可以删除。第一项中修改codec为alc892,codecID为283904146,这是0x10ec0892十六进制转换过来的。在codec_dump开头中可以找到,macos的计算器有进制转换功能。configData中修改为自己的configdata即可。LayoutID修改为1(全篇LayoutID所有统一为1,也可统一为其他数字)

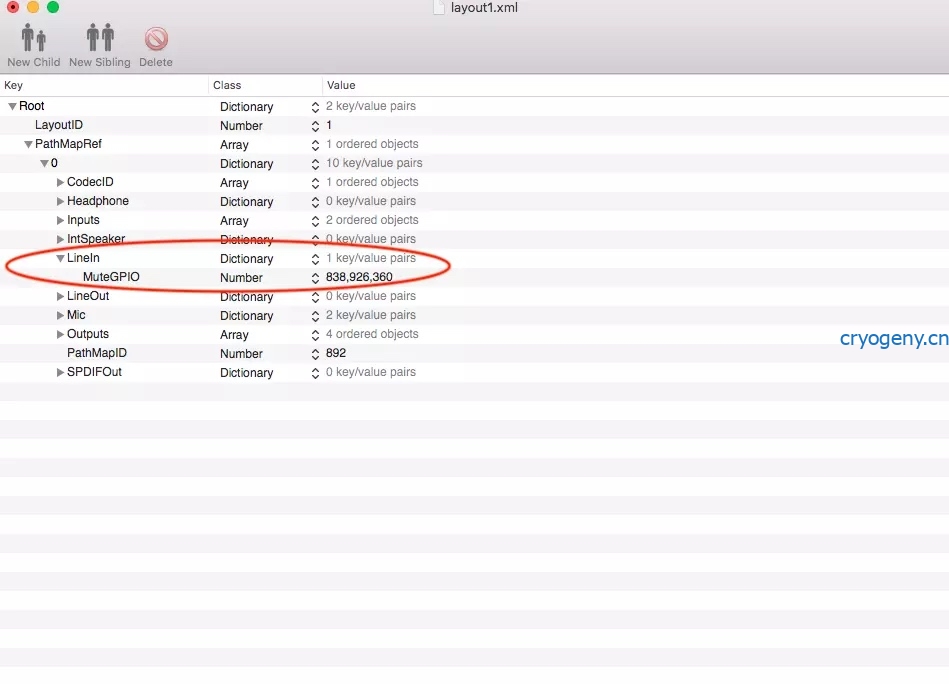
- Applealc-master——resources——alc892中layout1.xml.zlib
描述声卡型号以及声卡ID信息
首先向zlib文件转换为xml文件才可以编辑
LayoutID修改为1(全篇LayoutID所有统一为1,也可统一为其他数字),修改codecID为283904146,这是0x10ec0892十六进制转换过来的。在codec_dump开头中可以找到,macos的计算器有进制转换功能。
pathmapID修改为892。部分声卡需要删除lineout项才能驱动,需要自行尝试。

外置mic需要修改电压控制值来实现外置mic驱动。
搜索codec中外置mic下的vref值,vref含义为初始电压基础上增加的百分比,如图为vref为50。当vref不为Hiz时,muteGPIO={(vref转换为16进制)+"0100"+node id}转换为10进制,codec中vref表示的是十进制,计算时转为16进制。如:在节点 0x18发现vref_50,50转换为16进制=32,则muteGPIO=(32010018)转换为10进制=838926360;如果vref为Hiz,则muteGPIO=0
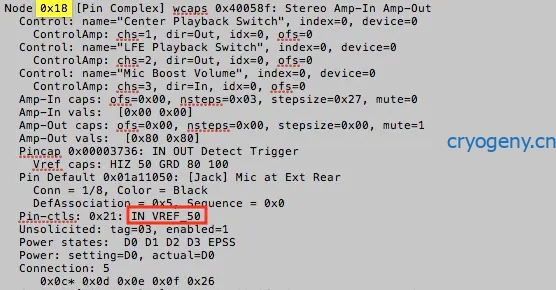
由于外置mic需要通过linein实现,因此修改linein中的muteGPIO为838926360
- Applealc-master——resources——alcxxx 中的info.Plist
-
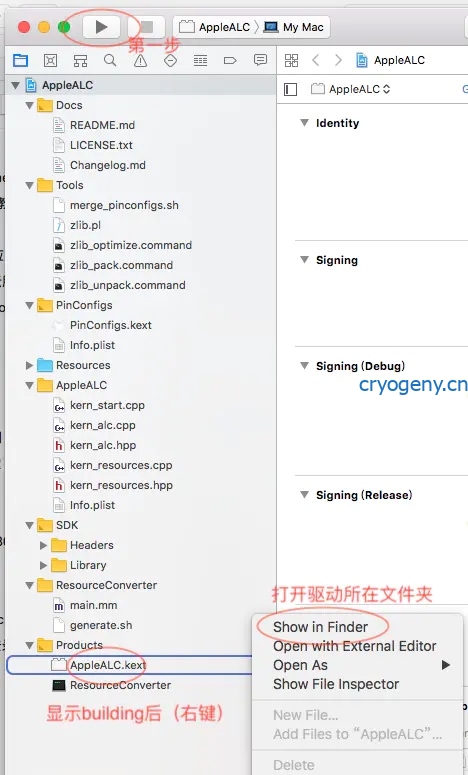
编译声卡驱动
-
还需要下载最新的lilu.kext放置在AppleALC-master的根目录,需要注意的是lilu.kext中必须包含有Resources(部分lilu.kext缺少该文件)将之前定制好的四个文件,放置在对应的位置,运行AppleALC-master中的AppleALC.xcodeproj
工具
ubuntu系统
verbit
zlib转换
关闭gatekeeper
sudo spctl –master-disable
回车即可关闭gatekeeper
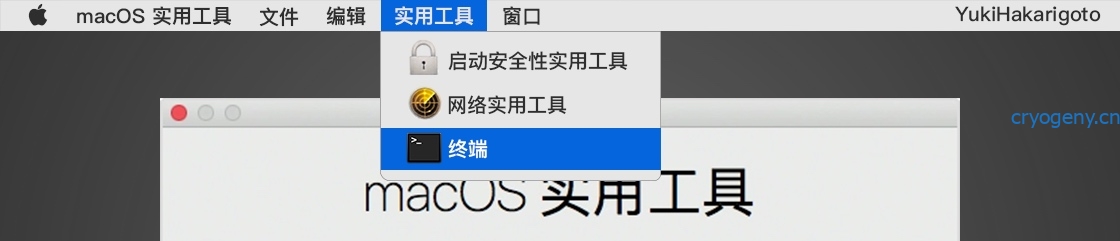
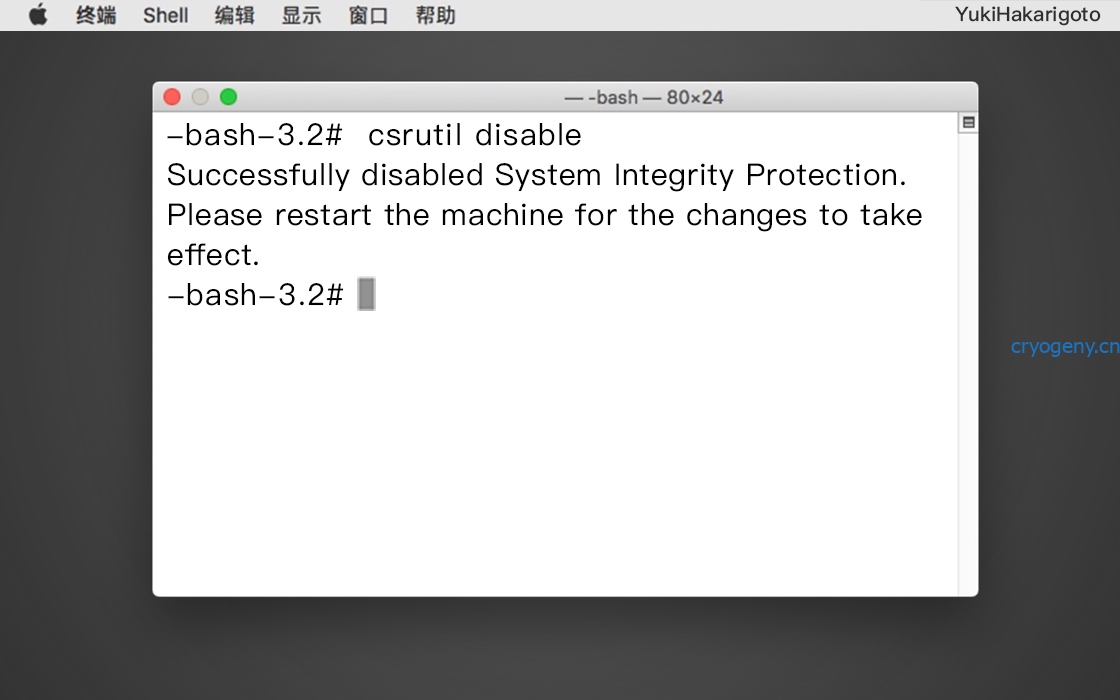
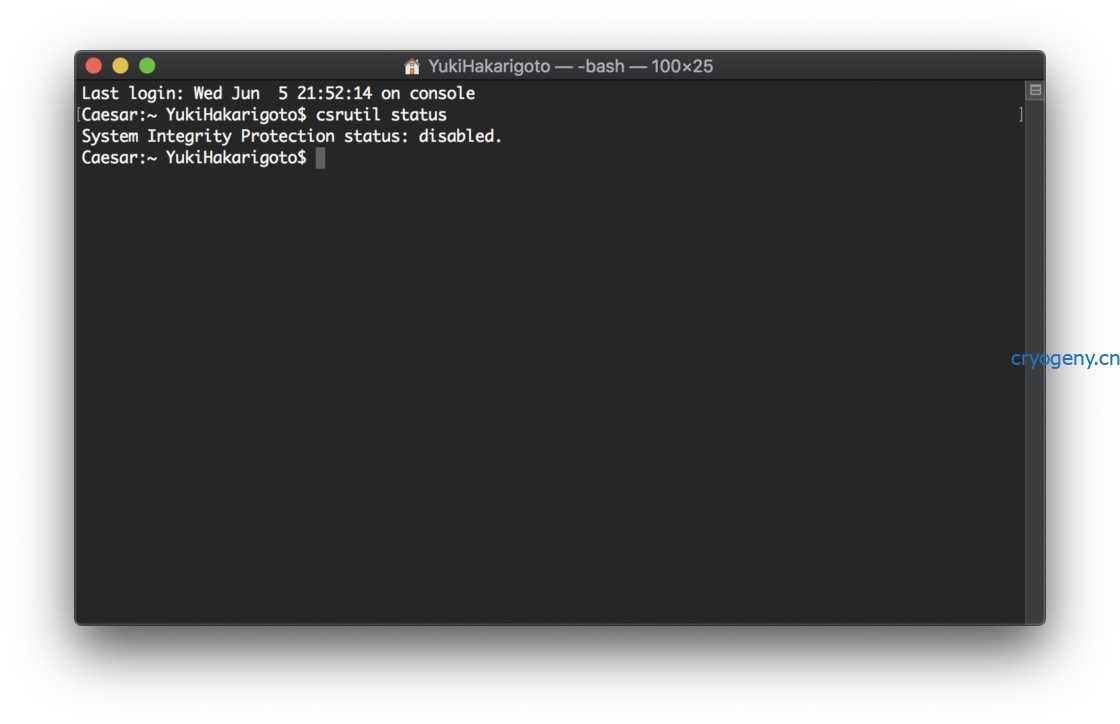
禁用system integration protection(SIP)
-
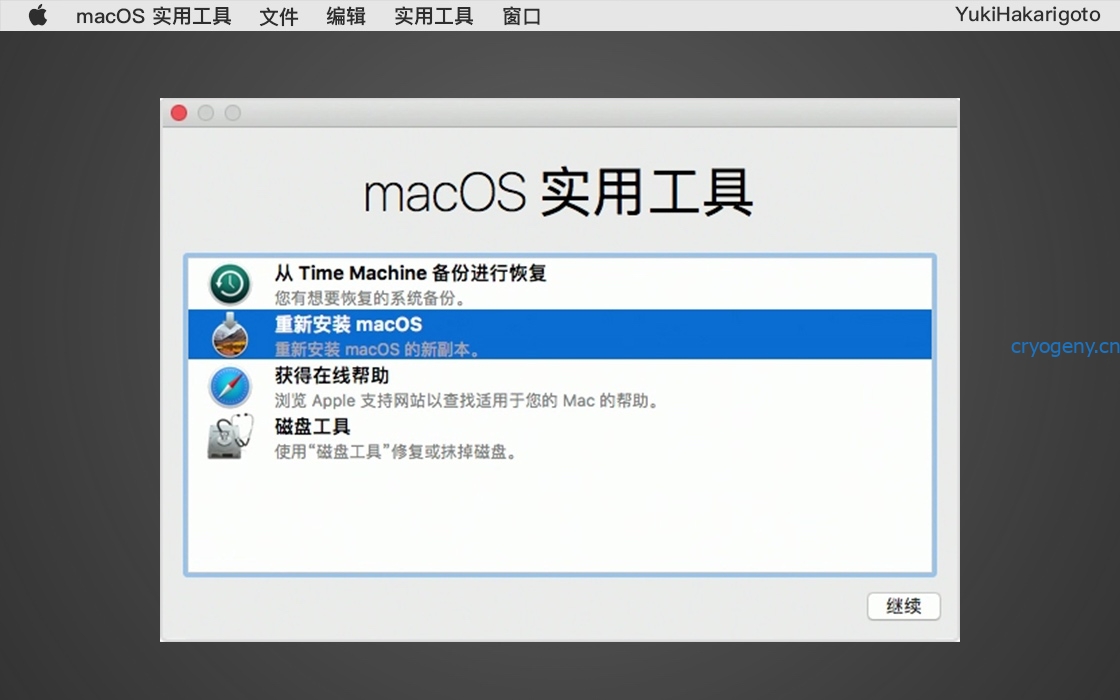
方法一 恢复模式下处理
- 将 Mac 开机,立即在键盘上按住 Command ⌘ + R,直到看到 Apple 标志或旋转的地球时松开。看到「实用工具」窗口时,恢复功能启动即完成。黑苹果下直接选择进入recovery模式即可。
-

-

-
方法二 采用Opencore配置config文件(不推荐)
- NVRAM–7C436110-AB2A-4BBB-A880-FE41995C9F82
- csr-active-config Data
- 10.15 E7030000
- 11 77000000
解锁cfg lock问题
参考黑果小兵
- 下载cfglock.efi和verifymsrE2.efi放到EFI/OC/tools下
- 修改config.plist在Misc-Tools字段添加 cfglock.efi 和 VerifyMsrE2.efi
- 重启在opencore 引导界面按 空格 并选择 cfglock 回车
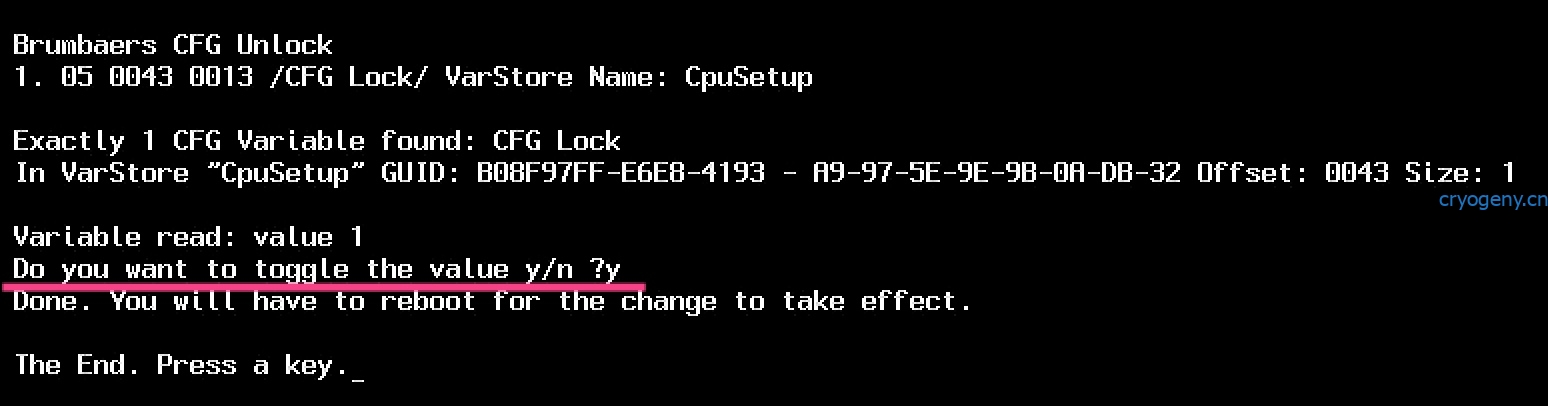 找到cfg lock的位置为 offset 0043,值为1,表示锁定;提问是否需要解锁,输入y 回车
 - 重启后再opencore 引导界面按空格 并选择 VerifyMsrE2 查看cfg lock 状态,显示为Unlocked
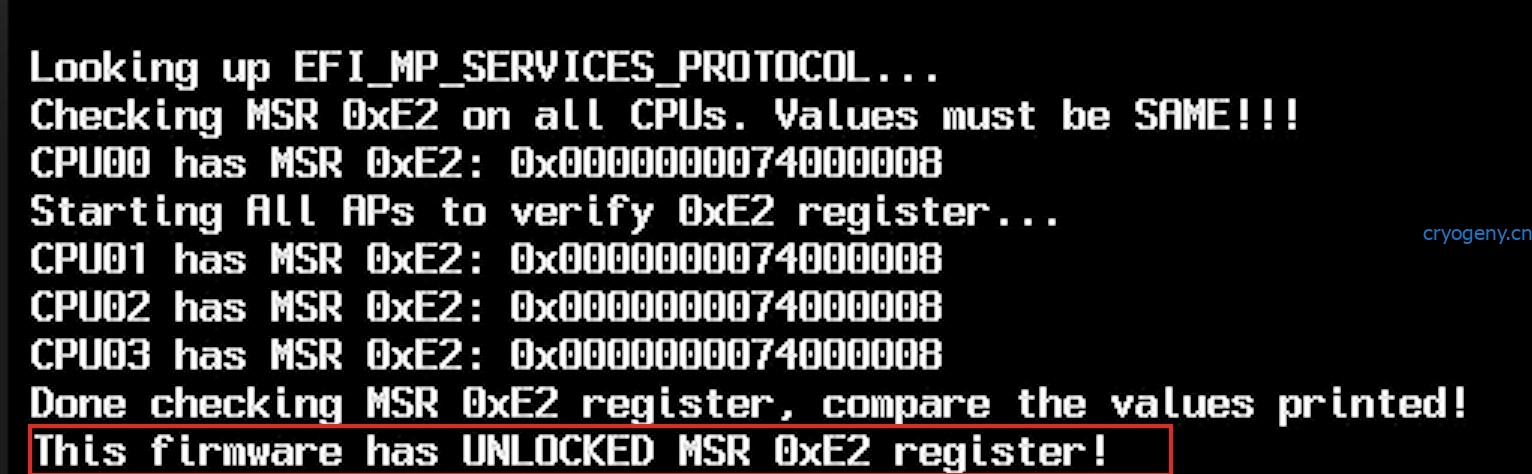
- 在config配置文件中取消AppleCpuCfglock或者AppleXcmpCfgLock
MacOS下手动挂载dmg中的EFI分区
- 双击dmg 安装包
- 打开terminal 运行 diskutil list 找到EFI分区的名称,如disk2s1
- sudo diskutil mount disk2s1
- 输入密码后回车到访达中可以看到EFI分区已经挂载
Adobe 的支持处理
其他问题
实例
X4 760k-860k
- 下载镜像HighSierraV3unoffical.dmg镜像,并使用transmac烧录到u盘中,也许也可以用etcher试一下。
-
开机进 clover引导界面下,找到Option

,修改引导参数 主要是增加 nv_disable=1

-
boot from HighSierraAMD
-
进入安装界面,先用utility中的disk工具格式化磁盘,磁盘分区名macOS
-
采用high sierra 安装时会出现提示镜像损坏
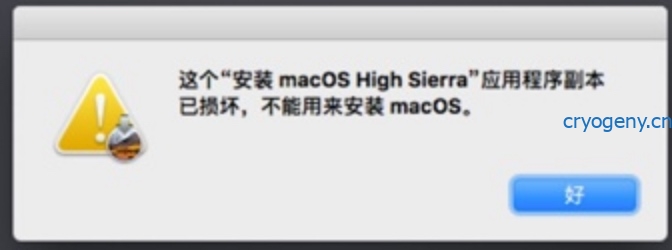
-
点击上方的Finder 工具栏,进入terminal 输入 date 032208102015.20
- 备注
    date 0201010116(OS X El Capitan 10.11.6适用)
    date 010514102017.30(macOS Sierra 10.12适用)
    date 062614102014.30 (10.13、10.14适用)
    date 121212122019 (10.15)
    date 032208102015.20
    date 112202022015
    date 122014102015.30(10.10可用)
- 退出terminal就可以继续安装了,安装完成后自动重启
- 选 boot macOS from highSierraAMD
- 再进terminal中
cd /Volumes/HighSierraAMD at the prompt

preinstall

macOS
- 手动重启再进boot from macOS,此时会继续安装macOS [20+min]
- 自动重启后 再进入boot from highSierraAMD
输入命令
cd /Volumes/HighSierraAMD

amd

macOS
再重启进macOS进入系统设置
XPS15-9560
BIOS设置
| Variable | Offset | Default | Desired | Comment |
|---|---|---|---|---|
| Above 4GB MMIO BIOS assignment | 0x79A | 0x00 (Disabled) | 0x01 (Enabled) | |
| ACPI Removal Object Suppport | 0x491 | 0x00 (Disabled) | 0x00 | |
| CFG Lock | 0x4ED | 0x01 (Enabled) | 0x00 (Disabled) | |
| CSM Support | 0xFC8 | 0x01 (Enabled) | 0x00 (Disabled) | |
| DVMT Pre-Allocated | 0x795 | 0x02 (64M) | 0x02 (64M) | |
| DVMT Total Gfx Memory | 0x796 | 0x02 (256M) | 0x03 (MAX) | |
| GPIO filter | 0x47B | 0x00 | 0x01 | |
| GPIO3 Force Pwr | 0x45F | N/A | 0x01 | |
| Native OS Hot Plug | 0x479 | N/A | 0x01 | |
| Skip PCI OptionRom | 0x48F | 0x00 | 0x00 | |
| SW SMI on TBT hot-plug | 0x47A | 0x01 (Enabled) | 0x01 | |
| Thunderbolt Boot Support | 0x45B | 0x00 (Disabled) | 0x01 | |
| Thunderbolt Usb Support | 0x45A | 0x00 (Disabled) | 0x01 | |
| Thunderbolt(TM) PCIe Cache-line Size | 0x45E | 0x20 (32) | 0x80 (128) | |
| Wait time in ms after applying Force Pwr | 0x460 | 0xC8 (200) | 0xC8 (200) | |
| Wake From Thunderbolt(TM) Devices | 0x452 | 0x01 (Enabled) | 0x01 |
desktop i7-8700 GA-Z370-HD3-RX580-ALC892-I219-V
- 配置
- 处理器: 英特尔 i7 8700
- 主板: 技嘉 Z370-HD3
- 固态: 西数 SN750 500G(原三星 SM961 512G) / 三星 860 EVO 512G
- 内存: 16GB * 2 ( 金士顿 DDR4 2400MHz )
- 显卡: 迪兰恒进 RX580 8G 2304SP / 迪兰恒进 RX580 8G 2048SP(刷蓝宝石 RX570)
- 声卡: 瑞昱 ALC892
- 网卡: 有线 I219-V / 无线 BCM94360CD(免驱)
- BIOS设置
- BIOS 功能 – 快速启动 – 关闭
- BIOS 功能 – CSM 支持 – 关闭
- 集成外设 – 预设启动的显示设备 – PCEe 插槽 1
- 集成外设 – 4G 以上解码 – 启动
- 集成外设 – Inter Platform Trust Technology(PTT) – 关闭
- 集成外设 – USB 程序 – XHCI Hand-off – 开启
- 芯片组 – VT-d – 关闭
- 芯片组 – 内建显示核心 – 启动
- 芯片组 – DVMT 预载 Pre-Allocated – 128M
- 芯片组 – DVMT Total GFx Mem – 256M
- 电源管理 – RC6(Render Standby) – 启动
desktop 9900k_Asus_Prime_Z390-P_UHD630双屏
- 配置
- 主板: ASUS PRIME Z390-P
- BIOS版本:2808
- CPU: Intel® Core™ i9-9900K Processor
- 核显: Intel® UHD Graphics 630
- 板载网卡: Realtek® RTL8111H Gigabit LAN Controller
- WiFi/蓝牙: BCM943602CS(BT4.2)
- 声卡: Realtek® ALC 887 8-Channel High Definition Audio
- 固态硬盘: Samsung SSD 970 EVO Plus 500GB
- BIOS设置
- 高级-CPU设置–Intel(VMX) Virtualization Technology -enable
- 高级-北桥-显示设置–首选显卡-Auto,初始化IGPU-enable,DVMT Pre-Allocated-1024M,RC6-auto
- 高级-USB Configuration–XHCI Hand-off -enable
- 高级-内置设备-Serial Port Configuration-Serial Port -off
- 启动-启动设置–快速启动-disable,若出现错误等待按下F1键-disable
- 设置模式-高级模式
- 项目地址
- github EFI